Sunday, March 24, 2013

EASTER IN A SHADOW BOX: FILLING THE BOX


FILLING THE SHADOWBOX

SECTION 3:

DYEING THE EGGS

In the Bunny Burrow Mr. & Ms. E. Bunny are busy dyeing  eggs that will be hidden all over the world for children to discover on Easter morning.  This is the subject of the third shelf in our Easter Shadowbox project.

Copy & save to your computer.  Set to print at 9" x 6.25" using best printer settings.  Print onto matte presentation paper.
-----
The Background:  Make a copy of the background graphic onto matte presentation paper using your printer’s best settings.  The shelf as seen measures 5” wide by 3 ½” high by 2 ½: deep.  Make any necessary size adjustments so the graphic fits your shelf front to back and side to side.
Cut out the graphic and test fit it into your shelf, from front to corner, across back to corner and out to front.  Use a quality glue stick to adhere graphic in shelf.  


The Flooring:  Dried Sphagnum moss (craft store purchase) was used for the flooring.  I put a hand full in a bowl and use scissors to cut it into smaller pieces for ease in applying.  I applied a thick coating of Crafter’s Pick Ultimate glue to the floor. I dumped the moss onto it and pressed it into the glue.  After the glue had set a bit I used a wide soft-bristled paint brush to “sweep” the excess moss off the floor.  Bit of the moss were glued here and there on the front edge of the shelf.


A sign hangs from the back wall.  Print the sign graphic on bright white paper.   Choose which one you want to use and glue it to a piece matt board.  Cut out.  Tint the edges to match the sign with water color pencils.  Glue to back wall 


The Work Table:  Cut a ¾” long segment of ¾” diam. wood doweling for the tree trunk.  Soften a piece of Fimo  (I used #703 stone effect color but any brown color will work).and roll it flat and thin.   Paint the sides of the piece of dowel lightly with tacky glue and wrap the Fimo around it, cutting off the overlap on sides and the excess on top and bottom.  Roll long carrot-shaped pieces of the Fimo and press to sides of the trunk…7-8 of these root pieces should be about right.  Smooth the roots to the side of the trunk and let the pointed end bend out from the bottom….make each root a bit different.  As you add the root pieces keep in mind that they should not extend out from the edges of the table top when assembled.  Use a pointed stylus, or similar tool, to “scrape” the Fimo from top to bottom to add texture.  Use a flat, soft-bristled brush to gently brush off any loose particles of clay.  Bake according to Fimo package directions.  When the piece is cool antique it with a wash of half and half Delta Gel Stain Medium and a dark brown acrylic paint.  If needed, paint your piece a medium brown before antiquing it.


To create the table top; make a color copy of the table-top graphic onto bright white paper, using best photo settings.  Roughly cut out the picture and glue-stick it to a piece of matboard or similar thickness cardboard.  Cut out around the edges of the picture.  Color the bottom of the table top with water color pencil to slightly match the top of the table.  Use a dampened, dark brown water color pencil to color the edges of the table top.
Glue table top to the tree trunk base.

Copy & paste to your computer.  Set to print at 2.75" x 1.58"
Print onto bright white paper at best printer settings
========

Egg Dyeing Supplies: 

Eggs- Using instructions found in Section One of the Shadowbox make lots of Fimo eggs, white and pastel.


Egg dyeing Kit-   Print out the kit onto matte presentation paper using best printer settings.  Cut out pieces.  Score and fold on all lines.  Assemble the box top and lid using a tacky glue.  Insert the platform into the box. Use a 1/8” round paper punch to punch out six rounds of colored paper; glue onto platform as seen.  Form an egg-dipper from fine wire, using photo as a guide.  You may also choose to use a cut out of the dipper diagram instead.  Glue dipper in place.  If you are going to make a dipper separate from the box, bend it up between the holder and handle.  Cut out the holes in the Egg Holder.  Fill egg holder with colored eggs, using a bit of glue to hold. 

Un-dyed Eggs are displayed in a bowl…I used a polished acorn cap for my bowl.  

Glasses of Dye are made using Lite Brite pegs from a child’s game.  The pegs can be purchased separately thru Amazon.com or toy stores.  Cut ¼” sections from the large end; sand the bottom flat if necessary.  You may use them as is or use a Dremel tool to router out the inside of the glasses, deep enough to take an egg or just to enough to look like the glass is not full to the top.  Use clear nail polish to cover any dull spots from cutting or router.


The Bunnies are from Schleich and are sold separately for a few dollars each.  They are quite detailed and very nicely painted. They are about 1-7/8” tall to the top of their heads.  I purchased mine from a local farm supply store.  Amazon.com has them for a few more $$ than I paid over the counter.  
I antiqued them a bit with a medium brown gel stain wash to accent their fur a bit more.  I sliced thru both bunny’s hands with an X-acto knife so they could hold things (watch your fingers…remember, always cut away from yourselves!)..


For Mr. Bunny I made a simple green felt beret to celebrate his artistic work.    I hand sewed a running stitch around the outside of a felt round and pulled it tight.  I cut a hole in the top to accommodate an ear.  A tiny felt “stem” was glued on the top.  A green bow-tie of silk ribbon is around his neck.  In his hand he holds a paint brush.  
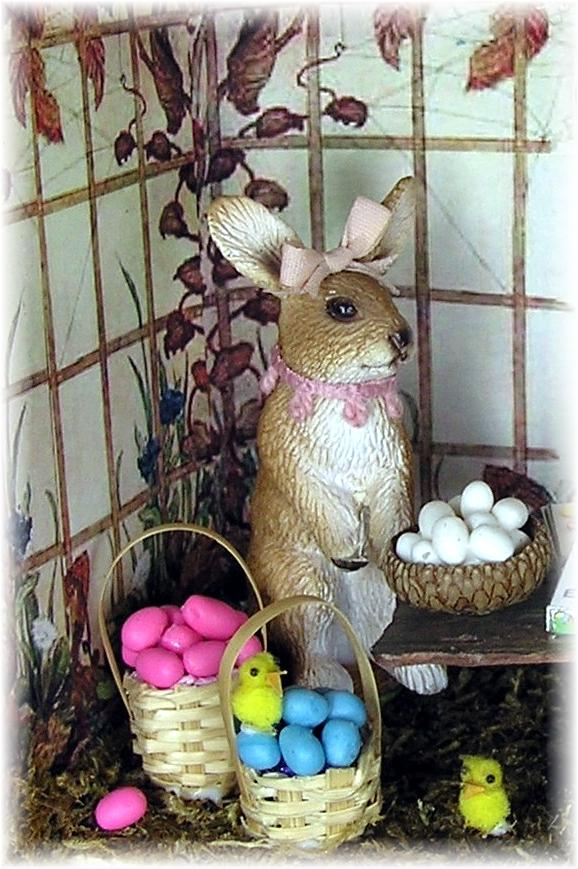
Ms. Bunny wears a pink silk bow on her head and a bit of vintage trim around her neck.  She holds a spoon (Chrysnbon). 


Baskets of dyed eggs sit on the ground and a few chicks (see the instructions in the first shelf instructions) have found their way to the burrow to watch the artists.


Next we will fill the next shelf with a group of Easter baskets full of goodies….hopefully in the next few days…Easter is sneaking up on me,
Joann


Saturday, March 16, 2013

EASTER IN A SHADOW BOX :FILLING THE BOX

FILLING THE BOX
SECTION TWO:
DELIVERING THE EGGS


Did you ever wonder how the Bunnies got the eggs they needed for Easter?  Well now you know and what a perfect subject to fill the 2nd section in our Shadow Box.
===========
The Rabbit:
Make a copy of the rabbit image onto matte presentation paper using best printer settings.  Carefully cut the image out that is facing right.  Cut the rabbit’s right arm from the front edge of the image to up past the elbow, following the black line.  Using the edge of a black permanent marker pen, color the very cut edges of the image.  Set aside

SET TO PRINT AT 3.27"W X 3.02"H
PRINT ONTO MATTE PRESENTATION PAPER
USING BEST SETTINGS
=====
The Background:

SET TO PRINT AT 10" W X 3.8" H
PRINT ONTO MATTE PRESENTATION PAPER
USING BEST SETTINGS
====
In my shadow box this section is 5 ½” w x 2 ½” deep.  A matte presentation paper copy of a vintage landscape was used as the background.  If you choose to use the same one this is what I did: I trimmed the sky area from the printie; around the trees I made slightly jagged cuts. I tried the cutout out in box with the left edge of the printie even with the left front edge of the section being decorated and clipped it in place to hold.  The printie in the back left corner curves around it rather than being glued in the corner, adding dimension.  With the curve in place I smoothed the printie to the right corner and marked where it would be creased to fit in that corner.  I then smoothed the printie to the right front edge and marked it with a crease.  I removed the printie and made a sharp crease for the right corner and trimmed the right side to the marked size.  If you hold the right side of the printie to the right side of the section it will be placed in, you will notice that it would extend out over the edge of the shelf and does not look quite right.  To solve this I trimmed the lower right corner of the printie back from the edge (see photo).


Looking at the left side of the printie, about a third of the way up from the bottom you will see a black line-like image.  Slice a slit across this line; this will be where the rabbit will be inserted.  Insert the rabbit so his hand is outside of the background and hold with a clip, trim off the bottom of rabbit that extends beyond the bottom of the background.  Place the background in the box; hold with a clip for a try-on. The rabbit should look somewhat like he is standing behind a hedge with his right hand extending out a bit so he can hold a basket. Adjust as necessary.  


Remove background printie.  Glue lower half of rabbit in place on back of printie. 
Cut a piece of adhesive-backed moss (this product is available in craft ((Michaels)), model railroad and floral stores, although it is not a must ((model railroad landscaping sheets or foam   http://www.amazon.com/Woodland-scenics-green-grass may also be used)) but the adhesive backed moss is so easy to work with)  to fit on the area of the background in front of the rabbit to  enhance the hedge look.

When your background is prepared glue it into the box by the left front edge, the right corner and right side.  Use a quality glue stick.   Lay the box on its back and dab tacky glue over the foliage on the trees in the center of the back ground.  Sprinkle model railroad, blended green turf  
http://www.amazon.com/Blended-Turf-Shaker   over the glue and pat it lightly.  Before the glue has set use a toothpick to slightly open up some of the areas.  This will add more dimension to the scene.  Tap the back of the box slightly to shake off any excess turf and clean box of any excess.


Cut a piece of the adhesive moss to fit the shelf and press on place.  Adhere some bits and pieces to the shelf’s front edge.


You may choose to add some tiny decorative flowers in front of the “hedge” for a bit of color and added interest.  For ease, I purchased mine ready made but one could easily make them using railroad flower landscaping material http://www.amazon.com/Scene-A-Rama-Scenery-Bags-Flowers  and fine wire.  


Glue a tiny woven basket into the rabbit’s hand.

The Cart:


You may choose to cut your own wood for the cart or do as I did and use Woodsies, pre-cut pieces…they come in oh so handy for fast little wood projects.


If you cut your own wood pieces use the measurements given on the photo. 
Glue the face of the ends to the edges of the bottom.  Glue the face of the sides to the edges of the bottom and ends.  Make sure all is squared-up and set aside until glue has set.  Sand all surfaces smooth. 
Cut a 1/16” wide strip of matte presentation paper (a good way to use up scraps left over from printies) and glue it around the top and bottom outside face of the cart.
Paint inside and out with 2 light coats of acrylic paint in color of your choice…I used a barn red.  When the paint has dried antique with a medium wash of brown acrylic and Delta’s Gel Stain Medium http://www.amazon.com/s/ref=nb_sb_noss?url=search-alias%3Daps&field-keywords=delta+gel+stain+medium.  Paint on the wash and wipe back off while it is still wet, in the direction wood grain would go.  When all is dry you may sand a bit here and there for an aged look.

Make cart sign printies on matte presentation paper using best printer settings.  Cut out.  Color the edges with a black permanent marking pen.  Glue signs to sides of cart, just under the top trim and centered side to side.

To make the two wheels, punch eight, ½” rounds for each wheel from a scrap of matte presentation paper.  Stack together, evenly, using a quality glue stick.  From the same paper, punch out a decorative spoke the same as or similar to the one shown and 1/8” rounds.  Center the spoke on the front of the wheel, and the round centered on it.  Centered on the back side of each wheel, drill or file out a hole, wide enough to take the blunt end of a round toothpick and deep enough to hold it in place a bit.   Paint the wheels a deep green and antique with the same wash used for the cart.  Color the edges of the wheels and the center round with black permanent marker pen.  You may also choose to Very lightly rub on some silver Rub ‘n Buff.


For the axle, measure across the bottom of your cart, side to side, and cut a round toothpick (points cut off)1/8” longer than this measurement .  Paint it black and when dry glue the ends into the recesses in the back of the wheels.  Glue the completed wheel assembly across the underside of the cart, centered evenly each way


Fill the cart with eggs following egg instructions given in filling section one of the shadow box.  You may use a fill in the bottom of the cart and just top with a layer or eggs.

The Rooster:

The rooster I used is from Safari LTD Toob Down ON THE FARM  http://www.amazon.com/Safari-LTD-Down-Farm-Toob .This comes with a variety of animals and  the nicest rooster I could find for the price.  Note: the Safari roosters sold separately are too large and the Farm animal Toob rooster is not as nice.  I painted his comb and feet and antiqued his white feathers a bit.


For the harness, cut a strip of very thin leather, suede, cording or ribbon 1/16” to 3/32” wide.  Glue a piece around the chest from side to side.  Glue another piece from the ends of the first piece, up and over the rooster’s back, just below the neck area.    Cut two lengths of very thin bamboo sticks ( look for bamboo runner, etc. at 2nd hand store…the wood is great because of its strength when cut very thin).  If you can’t find the bamboo you may choose to use lengths of wire.  

Cut lengths that will reach from the side of your rooster where the two parts of the harness touch to the side of the cart…the length will depend on how far you want your rooster from your cart.  Tie a knot of your harness material on one end of each of the sticks approx. 1/16” from the front end.  Hold the knot with glue and cut off all excess, leaving just the knot.  Glue the knot over the area on the rooster where the two harness parts meet, to cover it…use tacky glue so there is some flex in it and attach the other end to the side of the cart, as shown in photo.  You can adjust where the stick touches the cart if needed to make sure the rooster and cart line up. Should you use a different rooster.


For fun, add a few chicks (follow directions given in section one of filling the cart) on the cart who have hitched a ride with their dad.
Add the cart to you scene so the rooster and rabbit are looking at each other.


Now that the Easter Bunny has his eggs he is getting ready to prepare them for Easter…which will be the subject of Section 3 of the Shadow Box.

See you soon,
Joann


Monday, March 4, 2013

EASTER IN A SHADOW BOX

                              TO DATE:  
                                             PART 1, THE SHADOW BOX
                     PART 2, THE FIRST SECTION, "EGGS FOR SALE"

This photo is of the original 2003 version of this project.  It will give you an approximate idea of what the finished, filled  shadow box will look like.  
                                                         =================


Miniaturists are always on the look-out for new and different ways to display their collections.  One of the most practical ideas is the classic shadow box, but appropriate ones are not always easy to come by.  This shadow-box project offers an easy and inexpensive way to “frame” your treasures using simple hand tools to build your own.  The results belie the simplicity of the project…no special woodworking skills needed here. 
Note:  If for some reason or other you are unable to cut your own wood here are a couple of suggestions that have worked for others:  Ask the place where you purchase your lumber to cut the pieces for you, you may be surprised;  Explore your neighborhood for “that guy” who has a workshop full of tools and loves to use them….sometimes a dozen cookies does the trick;  Ask your local high school workshop teacher if there is a student who would like to make a few dollars for a simple job.  In the past I have done all these three with success.  


You may want to make more than one because different styles of picture frames, rudimentary painting skills, assorted decorative mouldings, and such, can make each shadow-box an individual piece of art and a wonderful gift. They can become three-dimensional scrapbooks with the addition of photo and scrap cut-outs related to the theme of the miniatures displayed….for instance for a Mother or Father’s Day gift the miniatures displayed on the shelves could reflect the recipient’s hobbies and interests with related photo cut-outs backing each section.

This is a progressive project so it will be done in parts over a period of time.  Part one is the shadow box itself.  It will be followed by vignettes to fill the 6 sections of the box.  So let’s get started….

Joann

PART 2:
FILLING THE SHADOW BOX
SECTION ONE:  "EGGS FOR SALE"
==========
The background:
In my shadow box this section is 3-5/8” wide.  A paper copy of a vintage Easter printie was used as background.  If you choose to use the same one this is what I did: I trimmed the sky area from the printie; around the trees I made jagged cuts. I tried the cutout out in the section and decided to place it an unconventional way…the left edge of the printie is glued flat to the left edge of the back wall and the right edge of the printie is glued to front edge of the partition wall.  These two edges are the only parts glued down. This leaves a curve in the printie on the right hand corner, adding dimension to the scene.  Oh, and the printie sits up approx. ½ “ up from the bottom of the section. I have made the printie extra long so you should be able to create the same dimensional look in your space even if it is wider than mine.   Of course you may just glue the printie, trimmed to fit, flat to back wall.  


Copy and paste to your computer.  Set to print at 7.75" w x 2.6"h.  Use best printer settings.
=======
I also made an extra printie on cardstock and cut the rooster from it.  The cut edges were colored black.  A dimensional tab was placed on the back of the rooster and then cut out was placed over the rooster on the background, adding more dimension. 
Copy and paste image to your computer.  Set to print at 0.93"w x 1.34"h.  Use best printer settings.
-------------------
A layer of Lichen (craft store purchase), to represent straw, was glued to cover the shelf.

The Hen is made by Schleich  
http://www.schleich-s.com/en/US/toys/farm_life/  She is a bit off scale but I chose to use her because she is available world-wide.  I sawed off her legs so she would sit rather than stand.  Glue your hen in place, snuggled into the “straw”. 


Eggs in Basket:
The eggs are formed from white Fimo.  Soften it and roll into an approx. 1/8” snake/coil.  For ease in measurement of the eggs you can make a copy of the Egg Template and lay your coil across it and use the vertical lines to cut the Fimo into pieces.  Otherwise cut 13/64segments of the coil.  Either way, roll each segment in your fingertips to a form an egg shaped oval, one end fatter than the other.  Bake your eggs according to Fimo package directions. Or if you have a heat gun you can do as I do with small pieces like this…put them in a paint free, small metal container (I use a copper plumbing cap sold in plumbing supplies at hardware stores…great for making your own copper pots).  Put the pot on a non-heat sensitive surface and hold the heat gun a few inches over it until the eggs are baked.  Move the heat gun around and around so the heat does not concentrate on one place too long.  This is a fast and easy way to cure little bits like the eggs but DON’T TOUCH THE CONTAINER …IT WILL BE VERY HOT.
Make enough eggs to fill a basket and a few other to put away for another section of the shadow box. 
The basket used here is a craft store purchase.  We will be exploring different ways to create Easter baskets later, for another section of the shadow box.  If you can’t see thru the sides of your basket you can fill the basket with whatever…I used a wad of white tissue paper…and then top with a layer of eggs, gluing them in place.  Glue the basket and a few eggs, here and there, on the straw. 


 Chicks:
For each chick you will need a 3mm and a 5mm yellow pom-pom for the head and body, yellow paper to match the pom-poms for the wings, a shade deeper yellow paper for the beak and feet, two tiny black no-hole beads for the eyes, and tacky glue.  The paper wings and feet may be hand cut or punched from paper.  For the beak fold the paper in half with a sharp crease and cut the shape with the large end on the fold.  For all gluing use the tiniest amount.


Glue a 3mm head to a 5mm body and set aside.  Glue hand-cut feet to the underside of the 5mm pom-pom.  If you are using the punched stars, glue them to the underside of the body so that three points of each of the two stars are showing.  Cut or punch out two wings from paper and glue to the sides of the body.  Glue the flat end of the beak centered on the front of the head.  Glue the no-hole bead eyes slightly above and on either side of the beak.  Make as may as you want to display, and maybe a couple of extras.  Glue in place in the scene.

See you soon with instructions for filling the 2nd section, where we will see how the eggs are delivered to the Easter Rabbit.  Hope you are having fun!

Joann
===============================


PART 1:
THE SHADOW BOX

Note: I have not added any decorative art to the corners of my new shadow box yet because I haven’t decided exactly what I want on them.  I also have not attached the frame-door as I want to be able to take better photos of the vignettes to come.
==========
You will need:  a purchased wood or composite picture frame (if you are planning on doing decorative painting on the frame one with less decorative moulding will work best;  an 8” x 10” was used here but other sizes may be used; no need to pay high prices for a frame, craft stores often offer big discounts on a regular basis and don’t forget 2nd hand stores)  +  plain or decorative moulding for the box sides and top; the width of the moulding will determine the depth of the box ; using plain rather than decorative moulding means you do not have to miter the corners of the sides and can just abut them…the basket weave moulding used here did not have to be miters  +  2 1/8” x ¼” stripwood for the shelves and partitions…this width makes the shelves  sit a bit back from the box’s front edges thus allowing for some decorative overhang of the display items   + larger size hobby miter box and razor saw or a  full sized miter box and saw  +  book board, matboard or illustration board for the box back  +  wood glue  +  small triangle ruler  +  acrylic or latex paint in your choice of color  +  tacky glue  + small brads (optional)  +  assorted decorative items of your choice (see instructions)  +   ¼” or 3/16” square bass wood stripwood  +  two small brass hinges and screws (see photo info)


Instructions:
Note: The measurements given here are for the wood I used; if you use different dimensions make any necessary adjustments.  When purchasing your wood take along a ruler to actually measure the width and depth as it may say 3” when in reality it is 2 ½” and so on…there are good explanations why online but they are too complicated for this brain, thus the ruler.

For the sample I used an 8” X 10” size picture frame in an antique white for the door.  The size of the frame used will determine the size of your shadow box and serve as its door.

Remove the backing and glass from the frame and set the glass aside.


For the box back, trace or transfer the dimensions of the frame to a piece of bookboard, matboard or illustration board and carefully cut out.


Select either plain or decorative molding for the box’s sides, top and bottom, according to your tastes or to fit with the theme of the box….keeping in mind your mitering skills as plain moulding does not have to be mitered.  As seen the moulding for the sides, top and bottom are 5/16” thick x 2 ½” wide in a basket weave pattern, purchased from Lowes   www.lowes.com .  The bottom shelf wood is 2 ½” w x ½” thick and is glued to the underside of the bottom piece …this makes the bottom shelf sit up higher from the bottom of the frame, allowing what is displayed thereon easier to see. 


The top, bottom and sides will be glued ON TOP of the backing piece, outside edges flush.  Measure and cut the two side pieces first and then top and bottom pieces to fit between them, using the back piece as a guide for the measurements.    Use wood glue to adhere the pieces together, making sure the assembly fits exactly on the back piece…do not glue it in place yet.  Set aside until the glue sets. 


When cutting the shelves and partitions keep in mind what you may want to display.  Use a small triangle ruler to measure and mark the desired height and location of the shelves on the side pieces.  Cut the shelves, check for a good fit, and glue in place between sides, BACK EDGES FLUSH with the back edge of the sides. 
Note: If you are like me and cut a shelf a bit to short, simply glue a piece of paper or cardstock on an end until you get a good fit. 
For strength you may choose to use thin brads to anchor all joins, sides to top & bottom, shelves to sides.  Slightly inset the brad heads.  Measure, mark, cut and glue the partitions in place in the same manner as the shelves.   Do any light sanding as needed for a smooth finish inside and out.


Paint the assembled piece to match as closely as possible the color of the frame.  Of course you can also paint the frame.  I used Linen White latex paint antiqued with a light brown wash to soften the color and accent the woven pattern. 

Working on the box back:  Paint the edges and backside of the back piece to match the shelf assembly.   If you have an idea of what you will be displaying in your shadow box you will find it easier to decorate the back wall before gluing the shelf assembly to it.  You may choose to paint or wallpaper the front facing side of the back piece.  Be sure to use subtle tones so as not to interfere with the minis on display. I used a sheet of paper from a full-sized wallpaper sample book that is white with overlays of pastel pinks and blues.  A quality glue stick was used to adhere the paper.  Note:  Wallpaper sample books are a wonderful source of interesting papers with many uses in miniature work.  Ask your local dealer for out of date books...they may charge a few dollars but they are well worth it.   Lay the shelf assembly over the top and lightly trace the openings.   I used a combination of cutouts from vintage Easter greeting cards and decorative painting to accent some spaces….I will include printies for these as we fill the shelves with Easter miniatures.

When the back piece is ready, attach, evenly, to the back of the shelf assembly with tacky glue..

Working on the frame door:  Paint and decorate the frame as desired.  Decorative painting may be used in corners, as seen on my original shadow box.  


Small prints may be added with decoupage.  A crackle finish works well.  A light antiquing will add depth and character. 

Use a tacky glue to lightly attach the glass into the frame.  To hold glass in place, cut four pieces of 1/8” or 3/16” square stripwood to fit in the rabbet (the recess between the glass and the back of the frame).  Paint to match frame and glue them in place. 


Attach the frame to the box with two small brass hinges.


The door may be held closed with a clasp, latch, magnet, or Velcro. 
If the box is to be hung on a wall add pictures hanger/s to the back, attached to the wood moulding.

See you soon with the next part of the project, filling one of the shadow box openings...

Joann