
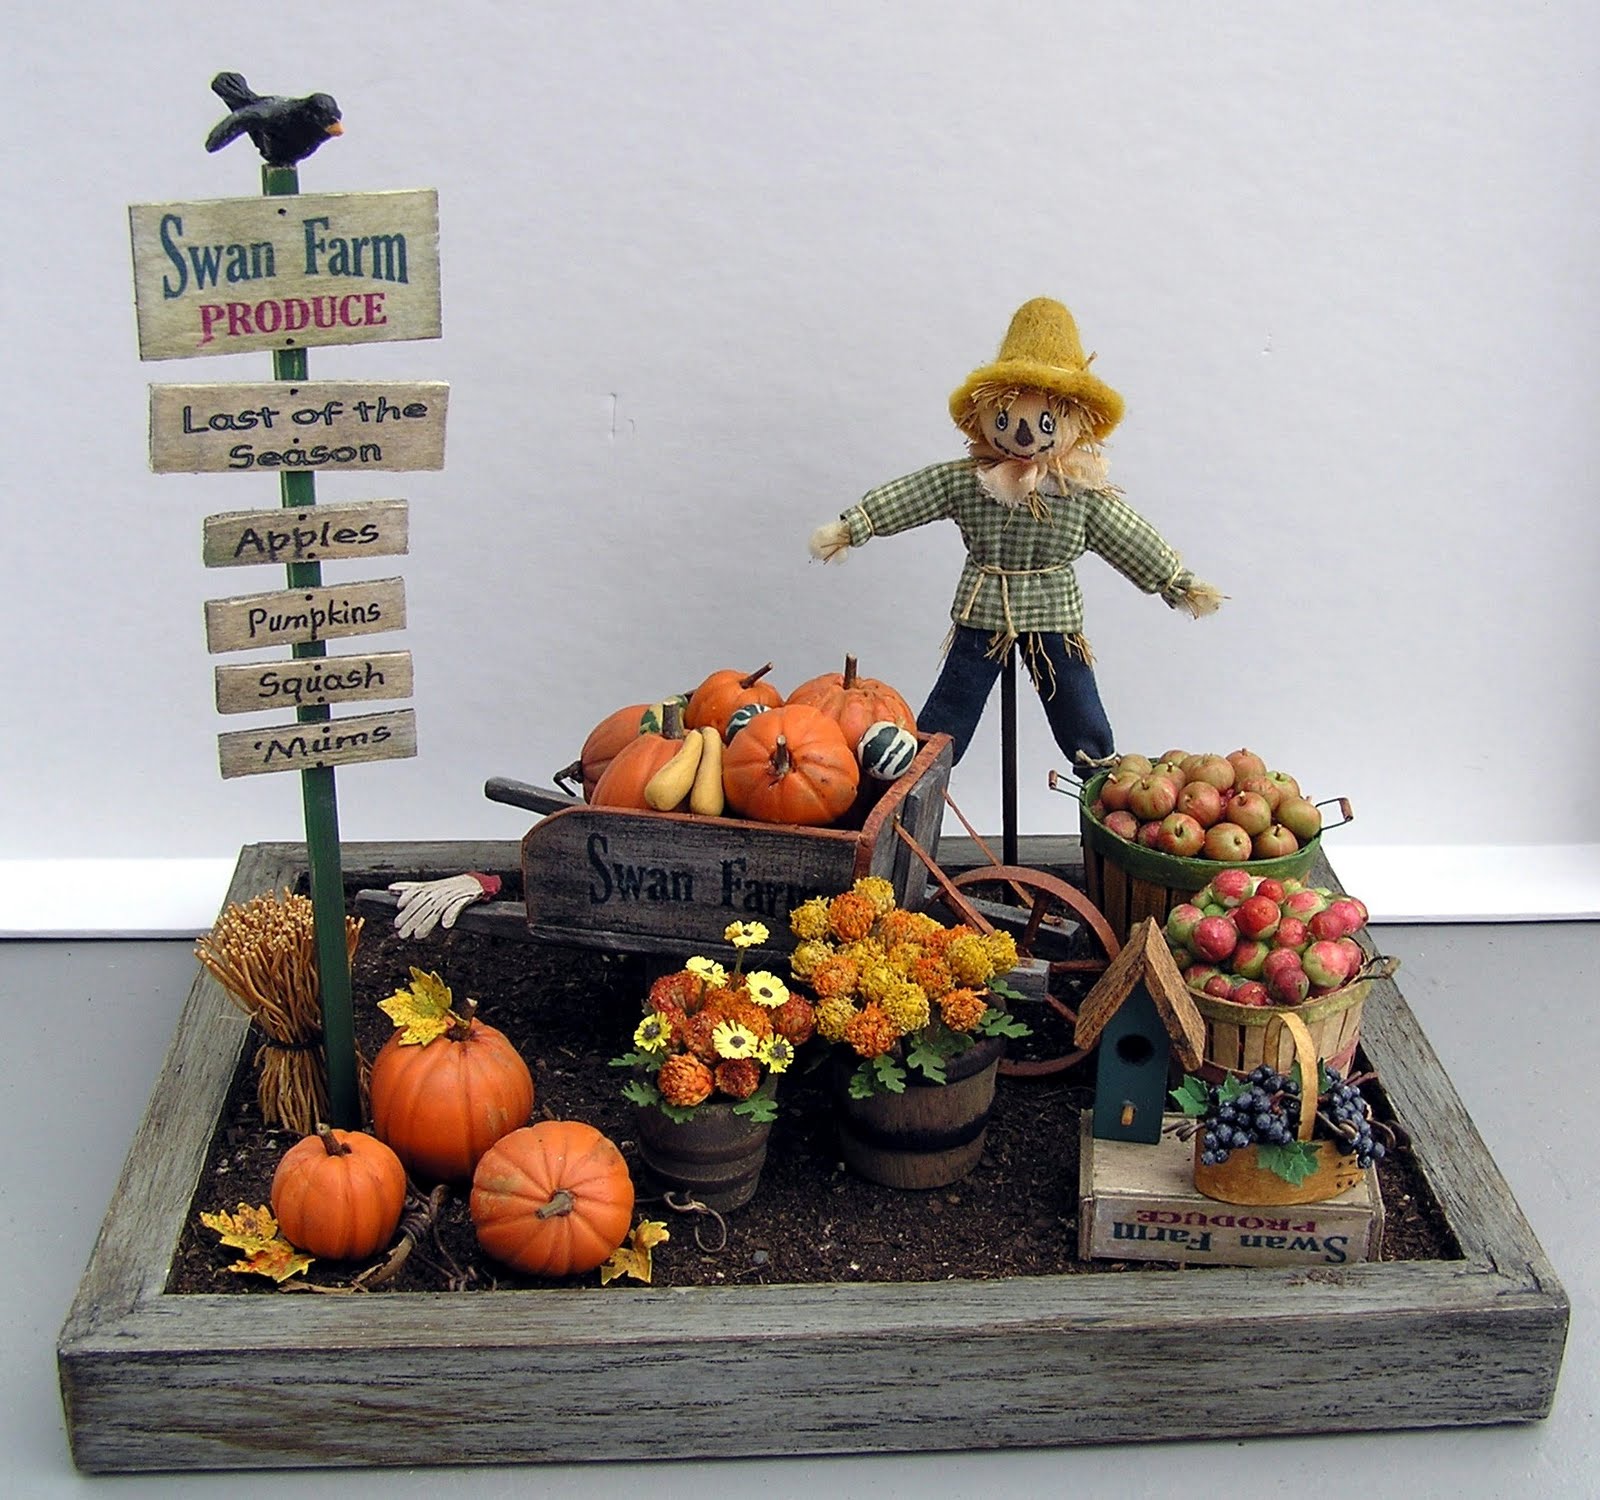
A BIT OF AUTUMN
Part 1

“Autumn, the year’s last, loveliest smile.”
William Cullen Bryant, 1784-1878
The time periods after summer and before the winter holidays often leave seasonal
decorating voids in our homes. So I offer here a colorful, miniature vignette for you
to create to help fill those voids…A Bit of Autumn.
decorating voids in our homes. So I offer here a colorful, miniature vignette for you
to create to help fill those voids…A Bit of Autumn.
I am fond of small-sized, miniature vignettes that speak of a holiday, a special event
or a season of the year, which can be displayed with ease on a table top or such.
They can tell a large story in a small space. You may choose to create my version
of autumn or use my ideas as a jumping off point, filling in with pieces from your
miniature collections. Whatever, anyone viewing your Autumn vignette is sure to
pick up the scent of a bonfire burning leaves and hunger for a slice of pumpkin pie.
Joann
PS
On a personal note, as the holidays rapidly approach, I would
like to ask you to donate non-perishable foods to your local
food bank or other such organizaton. And did you know
that every $1 you donate to your food bank = 7 meals?
Thank you in advance!
---------------------------------------------------------------------------------
INSTRUCTIONS
Note: Throughout this project items in bold are what is needed or suggested to
create it. Unless otherwise stated, Crafter’s Pick The Ultimate Glue was used for
adhesion.
create it. Unless otherwise stated, Crafter’s Pick The Ultimate Glue was used for
adhesion.
THE BASE
This little autumn scene sits on a simple base made from a purchased 5” x 7”
picture frame; chose a style that seems appropriate to you. The one used here
was a rather plain wooden frame that was repainted a light gray and then washed
with black/brown stain for a weathered appearance. To assemble the base, first
remove everything from the frame. Paint as desired or leave as is. Turn the frame
backside up and cut a piece of .080 Davey chipboard to fit the back opening.
Note: If desired you may just use the original frame backing for this piece
(removing the easel if one is attached) but it will not be as sturdy. Note: The
backside of the frame will now be the top of the base as it has a larger area to
work on. Paint the bottom of the chipboard to match the frame front and the
top of it a dark brown with acrylics/craft paint. When paint has set, glue the
chipboard into the rabbet of the frame so the brown side is facing up on what
was the backside of the frame; let glue set.
Use a fine sifter to sift some full-sized, sterilized potting soil. Coat the whole
of the top of the chipboard heavily with Crafter’s Pick Ultimate Glue &
immediately sprinkle the sifted potting soil over the glue. Pat down the soil to make
sure all is well coated and let glue set. Tap and lightly brush off the loose soil.
The soil may be lightly sprayed with a non glossy acrylic finish or hairspray.

--------------------------------------------------------------------------------------------------------
RUSTIC WHEELBARROW


1. Cut parts A (bed), B (back), C (sides), D (back support) from .060 (approx.
1/16"
thickness) Davey Chipboard. Round-off the edges of the short side of back
piece A with sandpaper.
1/16"
thickness) Davey Chipboard. Round-off the edges of the short side of back
piece A with sandpaper.
2. Paint both sides of A, B, C, D pieces with a light gray acrylic. When paint
is dry, scrape over flat surfaces with a medium toothed razor saw, in the
direction a wood grain would go, to add texture. Make a mixture of 1/3 black
acrylic and 2/3 Delta Gel Stain Medium. Paint this stain mixture on the pieces;
while it is still wet, wipe it back off in the direction of the “wood grain”. Slightly
dampen a piece of soft toweling & continue to gently wipe off the stain until your
preferred weathered-look is achieved. Make a half and half mixture of Dark
Burnt Umber acrylic and Delta Gel Stain Medium. Using a small, stiff
bristled brush apply this brown stain mixture, in a dry-brush method, to add
more weathering, especially in places where it would naturally occur.
3. Glue Back Support (D) to outside of back (B), top and bottom edges flush
and centered side to side. Glue the short edge of bed (A) to the face of B’s
straight side, bottom edges flush and sitting at the angle shown in diagram.
Glue sides (C) to face of bed & back pieces, outside edges flush.
and centered side to side. Glue the short edge of bed (A) to the face of B’s
straight side, bottom edges flush and sitting at the angle shown in diagram.
Glue sides (C) to face of bed & back pieces, outside edges flush.
4. Cut 1/16” wide strips of cardstock (at last 13” in total) for faux metal trim
(You will also use this for axle brackets in step 9). Paint strip/s with raw sienna
acrylic and when dry stipple with Burnt Sienna acrylic to achieve a rusted look.
Glue the “rusted metal” strips to cover the exposed edges of the back and side
pieces. For nail heads, use a toothpick to pick up and apply tiny dots of glue to
the tops of the rusted strips, approx. ¼” apart and centered side to side. When
glue has set color with Dark Burnt Umber Acrylic.
5. Cut two, 4 ½” handles from 3/16”sq. stripwood. Using the pattern as a
guide, carve and sand the first 1” of each for hand grips. Cut two legs per
pattern from 1/4” x 1/8” stripwood. Lightly soften all but the top edges of the
legs with sandpaper. Paint and weather all four of these pieces as was done
for pieces A-D. When they are dry, glue them to the underside of the
wheelbarrow bed, as shown. Add faux, glue-paint nail heads to bottom of
handles as shown in diagram and to handles and legs where they are “nailed”
together.
6. Use a razor saw to cut a 5/32” wide wheel rim from an approx. 1-3/8”
diam. rigid, plastic pill vial, turning the vial as you saw. Note: to keep the
plastic from cracking, insert a wooden dowel inside the vial first. Sand the
cut edges smooth.

8. Cut a 1” length of 1/16” diam. bamboo skewer for the axle. Slip it into
andthrough the holes in the hub until it extends evenly out both sides. Glue
a 1/8" grommetor a bell-shaped, jewelry finding (or similar shape, you
need 2 of these) over the axle and to the hub. Glue a 3mm round brass bead
(you need 2 of these) to the tips of the axle. Let the glue set and then paint the
whole wheel assembly rusty, as was described for the wheelbarrow’s top trim.

guide, carve and sand the first 1” of each for hand grips. Cut two legs per
pattern from 1/4” x 1/8” stripwood. Lightly soften all but the top edges of the
legs with sandpaper. Paint and weather all four of these pieces as was done
for pieces A-D. When they are dry, glue them to the underside of the
wheelbarrow bed, as shown. Add faux, glue-paint nail heads to bottom of
handles as shown in diagram and to handles and legs where they are “nailed”
together.
6. Use a razor saw to cut a 5/32” wide wheel rim from an approx. 1-3/8”
diam. rigid, plastic pill vial, turning the vial as you saw. Note: to keep the
plastic from cracking, insert a wooden dowel inside the vial first. Sand the
cut edges smooth.

7. For the wheel hubs, use a 1/16” round paper punch to make two holes in
cardstock. Center a 3/8” diam. flower-shaped paper punch over the holes
and punch out two flower shapes. Cut six, 3/4"” long spokes from 1/16” diam.
bamboo skewers. Glue the spokes to the face of one of the flower shaped
hubs, as shown in the diagram. Let the glue set. Glue the 2nd hub over
spokes, in line with the first hub, & press it down over the spokes. Let the glue
dry. Center the plastic rim over the spoke-assembly & draw pencil lines on the
spokes where they touch the rim. Nip off the spokes to the pencil marks for a
good fit. Glue the spoke assembly into the rim, centered side to side.
Let glue set.


8. Cut a 1” length of 1/16” diam. bamboo skewer for the axle. Slip it into
andthrough the holes in the hub until it extends evenly out both sides. Glue
a 1/8" grommetor a bell-shaped, jewelry finding (or similar shape, you
need 2 of these) over the axle and to the hub. Glue a 3mm round brass bead
(you need 2 of these) to the tips of the axle. Let the glue set and then paint the
whole wheel assembly rusty, as was described for the wheelbarrow’s top trim.

9. For axle brackets, cut two, ½” long pieces from the 1/16” cardstock strips
prepared in Step 4. With the wheelbarrow upside down, lay the wheel assembly
on the handles, approx. ¼” back from the un-tapered handle ends (this
measurement can vary, so check to see that your wheel would turn without hitting
the front of the wheelbarrow, and make adjustments of the axle’s placement if
necessary). Glue a prepared bracket to the top of the axle, centered where it
touched the handle; glue it down over the sides of the axle, then glue its ends
down to the handle. Repeat for the axle on the other side of the wheel.
These U-shaped brackets will hold the wheel in place.
10. For braces, cut two strips from lightweight metal (such as tea light
containers), 1 ¼” x 3/32”. Paint them rusty as with other strips. Bend the last
1/8” of the ends of each one at a slight angle. Glue these braces between
piece B and the handle extension in front of it, centered side to side on the
handle, adjusting the angled ends of the braces so they are flush with the
surface they are touching. Use a dot of Ultimate glue topped with a dot of
cyanoacrylate (Crazy, Super, etc.) glue to hold these braces in place.
Add faux nail heads where the braces and wheelbarrow meet.
Note: The words Swan Farm were added to the sides of the wheelbarrow.
How this was done will be described later in this project under “Signs”.
How this was done will be described later in this project under “Signs”.
Note: Click on the pattern sheet for a larger size image. Save this larger
pattern sheet to your computer and set the printer page size to
7.50" W x 10.38" H to print it out, for the 1" = 1' original size.
Or use the 1" Square-Key-To-Scale on the pattern sheet as a guide to
determine the correct or desired size.
pattern sheet to your computer and set the printer page size to
7.50" W x 10.38" H to print it out, for the 1" = 1' original size.
Or use the 1" Square-Key-To-Scale on the pattern sheet as a guide to
determine the correct or desired size.

---------------------------------------------------------------------------------------
BUSHEL BASKETS

1. Baskets and bands are cut from manila folder paper. To prepare paper mix
equalamounts of burnt umber acrylic and Delta Gel Stain Medium. Use this
mixture to color both side of the paper. Let dry.
equalamounts of burnt umber acrylic and Delta Gel Stain Medium. Use this
mixture to color both side of the paper. Let dry.
2. Cut the spoke/bottom piece & bands from prepared paper. Paint both
sides of bands with a light wash of green or red acrylic; lay flat and let dry
thoroughly.
3. Fold the spokes up from the bottom.
4. For the large basket, glue one of the larger bands around the outside of
the top of the spokes, top edges flush, pulling the spokes in as evenly as
possible so there is a slight gap between them; the top of the basket will
have a diam of approx. 1-1/2”. Overlap and glue the band end. Add a 2nd
band to the inside of the basket, in line with the first. Glue the narrower
band around the outside of the basket, ½” up from its bottom.
band around the outside of the basket, ½” up from its bottom.
5. For the short basket roll over one of the bands with a round pencil until it
turns on itself. Mark a 1/8” tab on one of this band; glue the end over the tab
to form a ring. Glue this ring over the tops of the spokes on the basket, top
edges flush, and spokes spaced evenly all around. Curve a second band
strip and glue it to the inside of the spokes, top edges flush with the outer
band; glue ends overlapping. Curve a third band and glue it around the
outside of the basket, bottom edges flush. Curve and glue the fourth band
around the outside center of basket.
strip and glue it to the inside of the spokes, top edges flush with the outer
band; glue ends overlapping. Curve a third band and glue it around the
outside of the basket, bottom edges flush. Curve and glue the fourth band
around the outside center of basket.
6. For handles shape pieces of 24-gauge wire. Push ends of handles
into top of basket between layers of spokes and bands using a needle
tool to open up space as needed. If desired 3/16” wide strips of brown
paper sacking may be wrapped, with glue, around tops of the wire
handles.
into top of basket between layers of spokes and bands using a needle
tool to open up space as needed. If desired 3/16” wide strips of brown
paper sacking may be wrapped, with glue, around tops of the wire
handles.
7. Fill with apples, pears, corn or other late season produce.
Hint: Filling the baskets part way with crumpled paper (or other filler),
of a color close to the produce, means you will not have to create as
much produce.
Hint: Filling the baskets part way with crumpled paper (or other filler),
of a color close to the produce, means you will not have to create as
much produce.

Save the pattern sheet to your computer. For correct 1"=1' size set
your printer to 7.51"W x 5.50"H. Or use the Key-To-Scale given
to adjust to correct size.
-----------------------------------------------------------------------------------------
PUMPKINS

1. Crush and roll a piece of
aluminum foil into a dense shape
slightly smaller than the desired size
of finished pumpkin. Keep in mind
that pumpkins come in many sizes
and shapes.
aluminum foil into a dense shape
slightly smaller than the desired size
of finished pumpkin. Keep in mind
that pumpkins come in many sizes
and shapes.
2. Use Orange Fimo as is or mix in yellows/golden
browns for a smooth blend of desired color.
Hint: As always, and if possible, it is very helpful to have the
"real thing” in front of you while trying o copy its color.
Working on a non stick surface roll the Fimo, pie crust style,
to an approx. 3/16 thickness. Wrap this Fimo sheet
around your foil shape, pinching at the top to seal; cut off excess.
Roll the Fimo covered ball in the palms of your hands to even it out.
3. Poke a needle tool into the “ball” to act as a handle, this will be
the top of your pumpkin; Indent a mark opposite from the needle
tool to mark the bottom of the pumpkin. With the back of an X-Acto
knife blade, or similar tool, or even a round toothpick, divide the
pumpkin sides, from top to bottom, into four fairly equal sections.
Divide each of these sections into three or four more.
Carefully twist out the needle tool and place the pumpkin on a piece
of glass or ceramic tile. Touch up indentations as needed on top.
of glass or ceramic tile. Touch up indentations as needed on top.
4. Press a dried cherry tomato or grape stem (aha, one more
item to add to your mini-stash) into the top of the pumpkin for a stem.
Bake your pumpkin/s on the glass according to Fimo package
directions. Pull stem off and glue back in place.
item to add to your mini-stash) into the top of the pumpkin for a stem.
Bake your pumpkin/s on the glass according to Fimo package
directions. Pull stem off and glue back in place.
Hint: For Jack O’Lanterns cut the top off the cooled pumpkin, pick
out the foil and cut a face into the pumpkin. A small hole in the
bottom-back of the Jack O’Lantern will allowadding a light.
out the foil and cut a face into the pumpkin. A small hole in the
bottom-back of the Jack O’Lantern will allowadding a light.

--------------------------------------------------------------------------------

GOURDS
Burpee’s catalog describes these as yellow,
orange, green and white fruits. Some with
stripes and bicolorand shaped like an apple,
orange, pear, bottle, etc.
Gourds are fun to make as it is hard to go
wrong with so many colors and shapes to
choose from. Try these ideas:
choose from. Try these ideas:
-Using a polymer clay or cold porcelain
make a dark green egg shape. Lay yellow/white
stripes down the sides, dividing it into approx. 8 sections.
Smear the snakes into the green.
make a dark green egg shape. Lay yellow/white
stripes down the sides, dividing it into approx. 8 sections.
Smear the snakes into the green.
- Create a golden pear shape. Chop the same color clay into very tiny bits.
Roll the “pear” into choppings for a very textured surface.
-Make a golden pear and a mottled green-yellow pear of the same shape
and size. Slice each in half crosswise. Put wrong halves back together to
form two-toned wholes
and size. Slice each in half crosswise. Put wrong halves back together to
form two-toned wholes
Gourds may be topped with cherry tomato or grape stems and glossed
after baking/drying.
after baking/drying.
------------------------------------------------------------------------------------------------------
APPLES

Plain Red Fimo may be used for some apples; a mixture of mainly golden
yellow and Transparent with just a tiny touch of leaf green Fimo will make
Golden Delicious; a mix of Leaf Green & Transparent with a bit of Golden
Yellow Fimo will make green apples. Form a ball of apple color Fimo shape
as shown, or to your liking. Cut a snippet of twig from something like a
grapevine wreath and poke one end in a tad of Burnt Umber acrylic paint.
Poke the painted end slightly into the bottom of your apple to slightly
indent and add a bit of color. Now poke it into the top of the apple, swirling
it around a bit to make the top opening a bit wider and leave it in place for
the stem. After baking, the stem can be snipped to desired length.
Color may be added to apple by using facial blush or pastel chalks applied
with a tiny make-up sponge.
it around a bit to make the top opening a bit wider and leave it in place for
the stem. After baking, the stem can be snipped to desired length.
Color may be added to apple by using facial blush or pastel chalks applied
with a tiny make-up sponge.

For quite awhile I have been using groupings of colorful Styrofoam balls cut from
largestems of faux flowers (found in the floral department of craft stores and in
floral shops). As you can see from the photo these come in a wide variety of colors
and sizes with the color looking to be sprayed on, giving an interesting, realistic
finish. On a whim Idiscovered that the balls could be manipulated into very realistic
looking individualfruits. To do this cut or pull the balls apart and then gently squeeze
them into theshape wanted. A small ball stylus will make indentations in the top and
bottomand a needle tool will poke a stem hole in the top (as needed). Color may
be added or used to touch up as described above for Fimo apples. This technique
is the perfectanswer for those that are not fond of working with clays, the results are
very satisfying.

-----------------------------------------------------------------------------------------------
Here’s hoping you enjoy this project and will find it useful in
whole or part and if you do I think Part 1 should keep you
busy for a week or so when I will add Part 2 of A BIT OF
AUTUMN.
busy for a week or so when I will add Part 2 of A BIT OF
AUTUMN.
Let me know what you think, as knowing “you” are out there
does help keep the creative juices flowing!!
I would like to thank all of you who viewed The Consummate
Bibliophile; I was overwhelmed by the response. A special
thank you to those who took the time to add a comment, it is
much appreciated.
Joann