

While “tidying” up my workroom I came across a DIY Christmas article of mine in a “vintage” Nutshell News. I remembered the fun I had creating the items therein and decided to put aside my “cleaning and tossing” for a few days and use the time to recreate some of the pieces for your DIY fun. Of course the original miniatures are long gone so I made them again, updating the instructions, photos and material’s lists as needed.
Enjoy,
Joann
======================
A SWEDISH CHRISTMAS
(Edited from original 1982 article)
Although I am not of Swedish heritage I was born and raised in a Scandinavian/American community (fondly referred to by all as “Snoose Junction”). I have fond memories of a month of Christmas that officially started on December 13th with the crowning of the Lucia Bride and ended with the final lighting of the Christmas tree on January 13th. In between, the days were filled with merriment.
Preparation for Christmas started early in December. Straw goats and ornaments were unpacked and refurbished. Stores were brimming with traditional Christmas items like carved wooden figures of Jultomten (gnomes), carved and brightly colored Dalecarlian horses, and barrels of lutefisk on the walks outside. Bakeries and kitchens, mothers and grandmothers all seemed to exude the delicious aromas of cardamom, ginger and the other ingredients that went into the many cakes, rolls, breads, and cookies of Christmas. Weekend evenings would often offer street dances for all, with schottisches being the favorite.
Preparation for Christmas started early in December. Straw goats and ornaments were unpacked and refurbished. Stores were brimming with traditional Christmas items like carved wooden figures of Jultomten (gnomes), carved and brightly colored Dalecarlian horses, and barrels of lutefisk on the walks outside. Bakeries and kitchens, mothers and grandmothers all seemed to exude the delicious aromas of cardamom, ginger and the other ingredients that went into the many cakes, rolls, breads, and cookies of Christmas. Weekend evenings would often offer street dances for all, with schottisches being the favorite.
I eventually married into a Swedish family and many of the traditions I fondly remember from my childhood have been incorporated into my family’s Christmas celebrations.
Here for your DIY perusal are some of my take on traditional Swedish Christmas pieces, in miniature. Add them to your Christmas collection or create a holiday scene around them.


====================
JULTOMTENS

At Christmas time I can remember many sizes of hand-carved Jultomtens filling the shelves & windows of gift shops and being displayed on mantels & table tops in homes. These little fellows are carved wooden figures representing mythical gnomes, who are the guardians of Swedish households and farms. Over the years they have come closer to looking like our Santa Claus and they bring the Christmas gifts.
Make your Jultomten in any size, !” and under, depending on where you will use them. Smaller ones may be hung on a tree; larger ones become table or mantle pieces. All should have the traditional red suit, red stocking-type hat, and white beard. The body should give the impression of being made of carved wood.
These little fellows are fun and fairly easy to create. They make a perfect group/club project with everyone bringing a supply of wooden beads & findings to share. No two will ever be alike; each will have his own personality.

You will need: Assorted wooden beads for bodies, bells, cones, etc. If they are red, so much the better + Assorted sizes round, unpainted wooden beads for head + red bead-head straight pins for noses (found in needlework supplies) + Optional: small pieces of doweling or toothpicks for arms & legs, etc. + small flat wooden or punched cardstock rounds for bases if needed + acrylic paint in black, white and red + red permanent marker pen (to color unpainted beads) + white beard/hair material such as chenille yarn (Hint: chenille can be found in sporting stores in the fishing section. In the past few years chenille throws have been very popular but they usually do not wash well, which means you are likely to find a nice variety for sale at 2nd hand stores. These are fairly easy to unweave giving you a “lifetime” supply of chenille yarn). Cotton, batting or faux fur may also be used + scraps of velveteen, knit ribbing (think baby socks), red quilling paper, or cone/bell shaped beads for hats + 3mm white pom-poms + Crafter’s Pick Incredibly Tacky Glue

Black & white photo from December 1982 Nutshell News magazine.
Instructions:
-If your body pieces are not red, color them so.
-Insert head bead on a toothpick to act as a handle while you paint the eyes.
-Apply the eyes by first painting black rounds. When paint is dry, center a white round on it, leaving just a bit of black showing. When the white is dry add a smaller black circle off to one side. To make this process even simpler, use a toothpick to apply the paint in a slight swirl motion.
-For the nose, use wire cutters to nip off the round from the head of a red head pin. Take caution when doing this for two reasons: the pin and the head can both fly, which means the pin can cause injuries and the trying to find a tiny, lost pin head is maddening. Glue the nose between and slightly down from the eyes.
-Glue head to a body bead of your choice. If the piece will not stand glue a round base to the bottom.
-Glue a beard on face. Glue hair to back of head, meeting up with beard. Trim beard and hair as needed or desired.
-Add a hat: Use either a red wooden bell or cone shaped bead or sew a tiny tube from ribbing cut from a sock, turn right side out, sew a running stitch and gather to form a sort of tassel on top and turn up a brim; or glue a triangle of red velveteen together to form a cone; or tightly roll a length of red quilling paper into a coil until it is wide enough to fit the top of your head . Glue the end to hold. Use a pencil or similar took to gently push out the coil to form a cone. Paint inside or outside with watered down glue to hold shape. Glue hats to head, at jaunty angles if desired and top with a 3mm white pom-pom or the snipped head of a white round head pin.

-Add buttons down the front of the body with paint or tiny punched rounds of paper. Black belts may be added.
-If desired, more detail can be added, such as arms, legs, feet with bits and pieces of this and that, but keep in mind that simplicity is part of the charm of these “rustic” little men.

Jultomtem photo from December 1982 Nutshell News magazine.
====================================
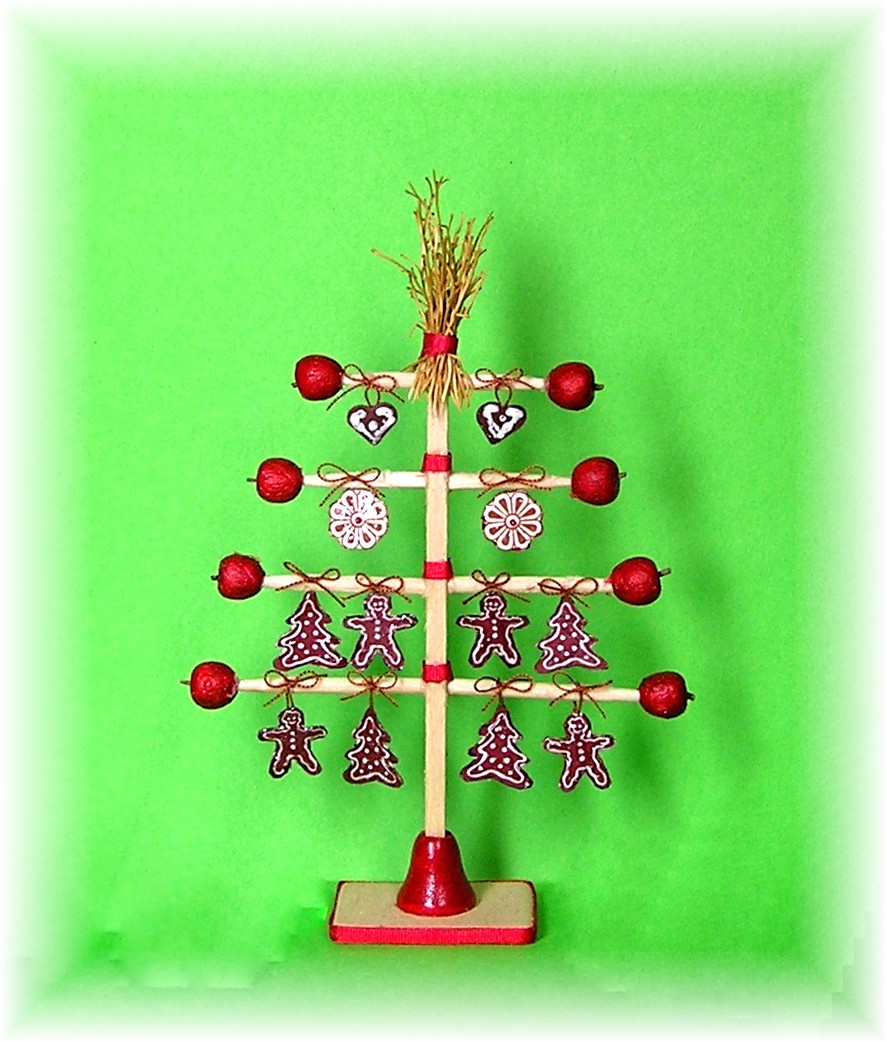
COOKIE TREE

A classic Swedish decoration, with many variations to be found, but most will have the traditional sheath of wheat and simply decorated ginger cookies.
You will need: 3” of 1/8” square basswood stripwood for the tree trunk + round toothpicks for the branches + 3/32” thick basswood for the base + ¼” square or bell shaped wooden bead, red or painted red for the tree holder + 1/8 “wide red silk ribbon + wheat looking dried grass (snippets cut from small versions of brooms often found in craft stores or check you whisk broom. Tips of some dried grasses/foliage will also work.) + 8 red apples (these can be Fimo or formed of Styrofoam balls (see instructions) + assorted ginger cookies (see instructions) + brown sewing thread + Crafter’s Pick Incredibly Tacky glue
Instructions .
-Mark the 3” piece of 1/8”square stick wood (the tree trunk) on two opposite sides, per diagram.
-Carve or sand the top of the trunk to a point.
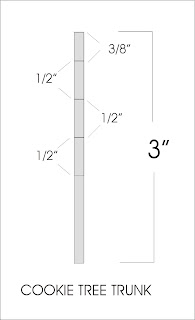

Copy & paste image to your computer.
Set to print at actual/exact size or 2.53"W x 4.15"H
Set to print at actual/exact size or 2.53"W x 4.15"H
--------------------------------
-Starting at a pointed end of toothpicks cut two pieces (branches) each, 1-1/8”, 1”, ¾”.
-Glue matching toothpick branch sections to the 1/8” square upright trunk on marked lines on each side of the trunk, centered side to side; shortest pairs on top and tapering on down. Let glue dry thoroughly.

.
-.Glue red, silk ribbon in half lengthwise, for a 1/16 “width. Starting & stopping at center back, wrap prepared ribbon around the tree trunk just above where the 2nd, 3rd & 4th branches touch the upright. Do not do this above the top branches.
-Gather a bundle of “wheat” approx.1-1/16” high & 3/16” thick. Wrap a piece of prepared ribbon around the bundle approx. ¼” up from the bottom of the bundle. Wrap it tightly and glue ends to hold. Insert prepared wheat bundle on pointed end of tree trunk, pushing it down so the ribbon area sits just above the top branches.

-From 3/32” thick basswood cut a base 1” x ¾”. Slightly round off the corners with fine sandpaper. Cover the edges of the base with the prepared ribbon, starting and stopping at center back.
-Enlarge the hole in your tree-holder bead so it will take the end of the tree truck. Glue the bead, centered on the base and when the glue has set, glue the tree firmly into the holder.

-Prepare 8 apples with stems. The apples may be made of Fimo but for this project I used red Styrofoam balls of the type found in craft stores in the faux flower section. The balls come glued together on stems in various forms and colors. At Christmas time you should be able to find nice red ones for your apples. Cut or pull the balls apart until you get 8 matching ones for this project. Gently squeeze the balls to the shape of an apple./ Use a medium ball stylus to indent the top & bottom of the apple. Using a needle tool, poke a fine hole in the apple’s top and insert, with glue, a snippet of fine twig for the stem. Apples may have color added for more detail or for touch-up as needed…acrylics, water color & pastels all will work. Poke a hole in the center bottom of the apple and push onto the tree branch ends. If your apples are Fimo you will have to ream out bottom hole so them will fit on branch ends. Do not apples glue on at this point, but mark where the apples end on the branch to help with cookie placement. Set apples aside.

-Prepare gingerbread cookies. The number of cookies on each stem can vary, depending on the size and shaped used. Your cookies may be made of a gingerbread brown Fimo rolled thin and cut with mini cookie cutters of by hand. You may use appropriate paper punches to punch out cookie shapes from brown paper. Or you may do what I did this time and used paper printies of cookies. To do this glue the uncut printie sheet onto gingerbread colored paper using glue stick. When glue has set cut out individual cookies.
If you are using paper for your cookies, turn the face down on a giving surface and roll around them with a large ball stylus to add some dimension.
To frost cookies you may choose to use any one or a combination of white acrylic paint, dimensional paint, such a Scribbles, caulking, or go over frosted areas of pre-frosted printies with Judi Kins Diamond Dimensional Glaze to add dimension.
Using a needle or fine needle tool, poke a hole in the top of the cookies. Add thread loops that are of a size that allow the cookies to hang between the branches. Note: If you want to “cheat” a bit or if your patience is like mine and wearing thin with age, you may simply glue the top tips of the cookies to the branches…Incredibly Tacky glue will hold almost instantly. You may also choose to add a tiny matching thread bows to the branch just above the cookies.
Once your cookies are positioned, glue the apples to the ends of the branches.

Click on image to enlarge. Copy & paste to your computer.
Set to print at actual/exact size or 4.16"W x 4.20"H
Print onto Matte Presentation paper
-----------
=========================