

------------------------------------------------------------------------------

So, here we have it, the completed Easter Cart with all of the projects on display.
I hope you are enjoying the project/s as much as I did presenting them to you. I would love to see photos of your finished cart. Wishing a joy filled Easter to all of you...can't believe it is just about here.....where did April go?
Mother's Day is just around the corner and I have something special in mind for you, if everything goes as planned.
Scroll to the bottom for a couple more photos of the completed Easter Cart.
=========================================
A Happy Spring to all of you...of course the weather here in the Pacific Northwest of the USA has yet toreceived the "It's Spring" message. I am so hoping the old adage of March holds true this year and "March goes out like a lamb". With everything so soggy and damp here I needed a project to help me think of lambs, and chicks, and bunnies and bright blossoming flowers and of course Easter. The Easter Peddler's Cart is what I came up with and I hope you enjoy making it as much as I did creating it. I know it looks a little bare right now but that will soon be remedied because over the next few weeks I will be adding, on a daily basis (or as close to that as I can) projects to fill in, on and around the cart. There will be a nice variety so I think you will find enough to keep you busy even if you don't create the cart itself.
This project makes a darling table display for the month of April and is one that can be added to, and changed about for years. Of course if Easter is not your thing, change the signs and sell fresh veggies or flowers, baked goods or sweets, or whatever merchandise "sings" to you.
Do check back every day or so and scroll down to see the cart slowly but surely fill up with fun and varied projects & kits to help you get into a Spring-frame of mind.
I had better get busy, many of little things to create...see you tomorrow,
Joann
----------------------------------------------------------------------------------------------------

THE EASTER PEDDLER’S CART
BASKET’S AND BUNNIES
The Cart
You will need: 2mm (approx. 3/32” thick) book board + 1/4” x 1/16” stripwood +
3/32” dowel or bamboo skewer + fine sandpaper + needle file + ¼”square stripwood + 1/16” thick sheet wood or matboard + ¾” x 1/16” + choice of canopy material, paper or fabric (vinyl wallpaper used here) + 3/16 “ or ¼” square styrene tubing (model railroad supply) + two 1-3/4” diam. wheels (you may look in 2nd hand shops for interesting wheels found on discarded toys, or look online for metal & wooden ones) + 3/32” to 1/8” bamboo skewer or dowel + black scrapbook paper + cart printies

Instructions:
1. You will be making a simple box using book board. Cut two sides 5-1/8” x 1-13/16”, two ends 2-9/16” x 1-13/16”, a top and a bottom 5-1/8” x 2-3/4”. Glue the edges of a side piece to the face for the top piece, outside edges flush. Glue the edges of the end pieces to the face of the top piece and side piece, all outside edges flush. Glue the second side piece in place, long edge to the face of the top piece and face to the edges of the end pieces, all edges flush and all squared up. Glue the face of the bottom piece to the edges of the side and end pieces forming a closed box.

CART PATTERN
Click on image to enlarge. Copy and paste to your computer.
Set printer to print at 6.92"W x 8.09"H or exact/actual size
------------------------------------------------------------------------
2. Cut four, 2-3/4” lengths of the 1/4” x 1/16” stripwood. Glue one each to the top and bottom of the face of the 2 box ends, all edges flush. Cut four, 1-1/2” pieces of the ¼” x 1/16” stripwood and glue to face of the ends forming a frame around the ends pieces.


3. Using 1/4” x 1/16” stripwood cut two top-of-sides trim pieces, 6 ¼” long. Round off one end as shown. Using a needle file ream out a hole thru the rounded end of these two trim pieces. The holes should be just large enough to take a 3/32” dowel snugly. Glue these two pieces to the sides of the box, covering the edges of the back trim, top edges flush and extensions to front. Use the 1/4" x 1/16" strip wood to frame around the rest of the two of the two sides, as shown in the diagram.


CART TRIM DIAGRAM
--------------------------------------------------------
4. Cut a length of 3/32’ dowel slightly longer than the span between the two holes in the top trim, approx. 4 ½ “. Insert dowel into outside of one hole and then, with a bit of glue, into inside of the 2nd hole until it is flush with the outside of the 2nd hole. Trim dowel so it is flush with the outside of the 1st hole. A bit of glue may be wiped over the cut ends of the dowel. Lightly sand all corner just a bit. You now have the cart bottom.


5. When all glue has set paint the whole cart bottom a color of your choice, a pastel color works best for this project. A buttermilk color was used here. Let paint dry thoroughly…this is an important step and may be sped-up with a heat gun. Some paint may be lightly sanded off in areas that would get more wear than others, such as the corners and edges. Make an antiquing/aging mixture of half and half Burnt Umber acrylic paint and Delta Gel Stain Medium. Working one section at a time, paint on the antiquing medium and, while it is still damp, use a soft cloth to wipe off in direction wood grain would go. Do not scrub, just wipe. You may use QTips or whatever to get into the corners. The amount of the medium you remove is up to you and depends on the effect you are looking for…the more medium left on the older the cart appears. At this point you may also use a very lightly damp, soft rag to remove more of the medium, again, not scrubbing. Continue in this manner until the effect is pleasing to you.

6. From ¼” square stripwood cut four, 4” lengths for the uprights and two 2-5/16” lengths for cross pieces/shelf supports. Mark an X in the bottom of each upright to find its center. Insert the end of a straight pin about 3/16” of an inch up into the center of the X; clip off the pin leaving about 3/16” extending. Add a bit of glue to the pinned end of the uprights and pound them into the corners of the top of the cart, just inside the trim edges. Make sure they are standing squared-up with the top of the cart. As seen they are glued 1-7/8” from the top of the cart but the height may be adjusted depending on what you choose to display on your cart that will be on the shelf that will sit on the
7. From ½” x 1/16” strip cut two top braces 5-1/4” long. Paint the inside of these pieces to match your cart. Glue a ½” side of these pieces to the outside of the uprights, top edges even and corners squared-up.


8. From 1/16” thick matboard or wood cut 2 canopy ends per pattern. If using canopy material other than vinyl wallpaper prepare for strength and fraying (iron-on facing for fabric & matte medium for plain paper). Paint the insides of these pieces to match cart. Cover outsides with chosen canopy material. If you would like a scalloped edge as seen here add ¼” to the length of material and use decorative scissors to cut scallops before gluing in place. Glue the prepared pieces to the outside faces of the uprights, and to the ends of the top braces.
9. Cut a 5-3/16” length of ¾” x 1/16” stripwood for canopy top support. Paint the underside to match cart. Glue the ¾” ends to face of the canopy of this piece to the faces of the canopy ends, top edges flush.


10. Cut a 4-3/4” x 5-3/8” piece of canopy material. Pre-creasing along the edges of the material that will be touching the side and top supports before gluing canopy in place will help with the job. Glue to top brace on outside(letting scallops extend down to match scallops on sides, if they were cut), and to top edges of side canopy supports and to top canopy support and down the other side in the same manner. Pre-fitting the canopy will aid in its assembly. And of course if you are using fabric for the canopy you may choose to turn back a hem before installing. If you choose to use a straight edge rather than a decorative one you can add a decorative edging after installation.


CANOPY PATTERN
Click on image to enlarge.
Copy & paste to computer.
Set printer to print at actual/exact size or 7.74"W x 10.83"H
---------------------------------------------------------------------------------

11. From 3/32” book board cut a shelf 5-3/16” x 2-3/16”. Paint and antique to match cart. Glue to top of side cross pieces. A narrow shelf edging may be added if desired.


12. For an axle cut a 2-1/4” length of 3/16” square styrene tubing and glue it across the bottom of the cart, 1-1/2” away from the back edge of the cart. Paint to match cart.


13. Look to 2nd hard stores for interesting wheels on kid’s toys or you may choose to use book board or wood to cut plain round wheels. Paint 1-3/4” wheels to match cart. Cut a strip of black scrapbook paper for tire rim and glue around tire.

14. Cut a 3-1/4” length of 3/32”or 1/8” bamboo skewer (you can use dowel but bamboo is stronger). Use a needlenose file to make holes in wheels of a size to take the dowel/skewer snuggly. Push it into the wheel with glue, until it is flush with the outside. Pass the dowel/skewer thru the axle and then add the 2nd wheel. Top with a ¼” punched round of poster paper painted to match wheel.

15. Cut a cart brace per pattern from 3/32” thick book board or sheet wood.. Paint to match cart. Test to see if cart sits evenly with the brace in place and if necessary make any adjustments by sanding the straight edge.. Glue the brace to bottom of cart, by the long edge and set in ¼” in from front edge, centered side to side.
16. Add printed signage: Using quality glue stick, adhere full rectangles to front and back of cart; adhere the rectangle with the bunnies on edges to center of sides of cart, with bunnies overlapping to the frame/trim pieces on either side. Glue the cut-out sign to a piece of white illustration/conservation board (or any white 1/32” thick board). When glue has completely set, trim board to match printie. Use craft glue to adhere these sign, centered on sides of canopy so the top of the sign extends over the top of the canopy.
17. The cart as seen sits on a white 8" x 10" picture frame. A purchased scrapbook printe of a cobblestone road is in the frame under the glass. Wooden findings have been glued to the underside of the frame for feet to raise the base just a bit. Both the frame and the feet have been painted and antiqued to match th cart.
The bunny pushing the cart is a re-painted resin piece from my collection...he just seemed perfect for the job.

----------------------------------------------------------------------------------------------------------------------
----------------------------------------------------------------------------------------------------------------------
17. The cart as seen sits on a white 8" x 10" picture frame. A purchased scrapbook printe of a cobblestone road is in the frame under the glass. Wooden findings have been glued to the underside of the frame for feet to raise the base just a bit. Both the frame and the feet have been painted and antiqued to match th cart.
The bunny pushing the cart is a re-painted resin piece from my collection...he just seemed perfect for the job.

Click on photo to enlarge and save and paste to your computer. Print out at exact/actual size
or set to print at 7.33"W x 3.55"H. Use best printer setting.
----------------------------------------------------------------------------------------------------------------------
----------------------------------------------------------------------------------------------------------------------
Project # 1: An Easter Feather Tree

You will need: one 6mm x 1” chenille stem (pastel colors or white or iridescent) + small sharp scissors + blunt edge wire cutters + strong craft glue such as Crafter’s Pick Incredibly Tacky + Krazy/Super glue + tweezers + white buttonhole thread + Iridescent Candy Pink Scribble's Dimensional Paint + a scrap of white mat board


1. Use scissors to trim chenille off stems close to the wire.
2. Use wire cutters to cut a 1 ½” trunk from the trimmed stem.
3. Cut or punch an approx.. 3/8” round or square of matboard for the base. Make a hole in the center of the base to take the end of the trunk; glue the trunk in place and let glue set.
4. Cut the rest of the trimmed stem into segments; six bottom branches 3/8” long, 6 middle branches 5/16” long, 5 top branches 3/16” long.
5. Make a small puddle of tacky glue and one of Krazy glue (I keep and use bottle lids for this purpose). Add the bottom branches evenly around the trunk, starting ½” up from the base, and tilted just slightly up. To do this hold a branch with tweezers and dip one end slightly into the tacky glue and then into the Krazy glue and then directly onto the branch. The Krazy glue will take hold instantly and help to hold until the tacky glue sets. Add the middle branches in the same manner, ¼” up from the bottom branches. Add the top branches ¼” up from the middle branches.
6. To decorate with pink eggs as shown cut about 2 “ lengths (or long enough to hold one end while working on the other) of white buttonhole thread. While holding with one hand squirt a drop of Iridescent Candy Pink Scribbles Dimensional paint onto the other end of the thread forming it into a egg shape about 1/8” long. Hold the thread in a until the paint has set. Make enough of these to go on each branch. Make a round shape for the tree top or use a tiny pink pearl. When all paint is dry cut off the eggs at the thread and glue the pointed side of the eggs under the branches, at their tips. Glue the round shape on the very top of the tree. Of course you may choose to use any or a mixture of pastel colors for your eggs. Tree base may have fine glitter added.
==============================================================
==============================================================
Project #2: Tulips for Sale by the Bunch

You will need: green cloth covered floral wire + yellow acrylic paint + 1/4" teardrop shaped paper punch + lightweight colored paper + large ball stylus or similar tool + pointed tweezers + Crafter's Pick Ultimate or Incredibly Tacky glue + green acrylic paint + leaf-green art/scrapbook paper + appropriate tall container + printie (optional)


Instructions:
1. Cut wire into 1-1/4" to 1-1/2" lengths. Dip the end of each wire into yellow acrylic paint and poke the other end into a scrap of Styrofoam until paint has set.2. Punch teardrop shapes from pastel colored, lightweight paper, six of a single color for each tulip.
3. Lay petals in the palm of your hand and draw over them, end to end, with a large ball stylus. This will cause the petals to cup-up and give them shape.
4. Holding a prepared stem in one hand, use pointed tweezers to pick up a petal by the pointed end and scoop up a bit of glue in the cupped oval end. Place the petal on the stem just down from the pointed tip. Add two more petals in the same manner so that the three petals are spaced even around the stem and are inline with the stem. Let the glue set a bit and then attach three more petal to the stem, between the previously glued petal. These three petals can be aligned with the stem for a bud-like bloom or lean out a bit for a more open flower. Let glue set.
5. Using a fine paintbrush to add a bit of green paint where the bottom of the petals meet the wire stem, floating the paint just a tiny bit onto the petals in irregular points.
6. For leaves, fold leaf-green art paper in half lengthwise with a sharp crease. Use scissors to cut approx. 1/8" wide by approx. 1" long slivers from the creased edge. Partially unfold and turn back the top half of the leaf. Add glue in the bottom half and wrap it around the stem of the tulip, bottom edges even; add 2-3 leaves to each flower.
7. Group the tulips in a tall container. A cap from a hair spray mist was used here but small prescription vials could work if cut down a bit...look through your cupboards for similar shapes. Paint them as desired, buttermilk color used here. Add a label if desired.

Click on image to enlarge. Copy and paste to your computer.
Print at actual/exact size or set to print at 2.77" W x 1.04" H
Print on bright white paper at best setting.
Project # 3: Easter Baskets

You will need: an assortment of colors of crepe paper (if you have older stock use it, the quality seems much better than today’s) + white craft glue + a ½” dowel or similar shape + clear plastic wrap + cloth covered wire (preferably white)

- Cut ¼” wide strips of crepe paper, cutting ACROSS the grain. Twist strip between thumb and fingers, slanting the rope formed downward and stretching as you twist. Pull gently to avoid kinks. Twist a 2nd rope in the same manner, and then knotting the two strands together at an end, twist the two ropes together. These double ropes may be of a single color or two different colors. You may even choose to use three single ropes, each of a different color.
- Cover the end of a ½” dowel, or any solid shape that is straight up and down or a tapered shape that is bigger at the bottom than the top (like the saw handle seen in the photo), with clear plastic wrap and hold to the dowel with a rubber band about ¾” up from the bottom. Your basket will be formed on this.
- Pick up a prepared rope & apply craft glue on the knot and up 2”. Hold the knot between thumb and index finger of left hand and form a coil of the rope on your index finger. Put a dab of glue on the center bottom of your form and press on the formed coil. Wrap the rope around and around the coil, covering the bottom and then up the sides until desired height of basket is reached, continually adding glue as you go. Cut off excess rope at an angle, pressing cut end into coil to hide. Should you run out of rope in the middle of a basket, simply make more and then meld the end of the new into the end on the form. Note: It is a good idea to keep a damp cloth at hand because your finger will get sticky.
- Make a think glue/water solution and paint basket with the mixture. Set aside to dry. When glue has set remove rubber band and slip basket with plastic wrap off of form. Make sure that the basket is dry and then gently pull the plastic wrap free from the basket.
- Cut a piece of cloth covered wired to desired length of basket handle. Hold two single ropes side by side and wrap around the wire with a bit of glue. Glue handle to inside of basket, pressing ends to basket to meld the ropes.
- -As seen the basket is filled with fine Easter grass topped by a Chocolate Easter Rabbit (Instructions follow) and colored eggs. The eggs are Styrofoam balls squeezed between finger to form a egg shape. They may be used as is or tinted with water colors, pastel chalk or acrylics. Look to floral departments of craft stores for floral stems with asst. sizes of balls on them…they are out there, I can attest to this by my ever growing stash…you know how it goes. A tiny silk bow on the basket handle tops the Easter Basket.
-
Project #4: Chocolate Easter Rabbits

The rabbits are made using a mini plastic candy mold, Country Kitchen Inc. #90-2119. This particular mold has 10 each of rabbits, ducks, baskets and egg on it. The rabbits are 1” high. The mold can either be used as a press mold with Fimo by first dusting the mold very lightly with cornstarch or with Plaster of Paris. If using Fimo, choose a brown color and press into mold and smooth out evenly. Use a needle tool or something similar to lift rabbit out of mold, smooth edges if needed and bake according to Fimo directions, or do as I sometimes do and use a hear gun to cure the clay. If using Plaster of Paris, follow package directions for mixing and spoon into molds. When plaster has set a bit, smooth off excess plaster, even with mold. When plaster has set push out the rabbit and when completely dry paint with brown acrylics. Either way give the rabbit a tan eye and add a bow with paint, dimensional paint, Fimo, silk ribbon, or crepe paper twist.
Use chocolate rabbits to fill Easter baskets or wrap in clear plastic wrap, tied at the top with a silk ribbon bow….whatever, they look good enough to eat, but don’t.
========================================================
Project #5: Easter Pull Toys

You will need: copy of printies on bright white paper + asst. colors of Fimo + craft glue & Krazy glue+ orange & blue, spice brown acrylic paints + 3/32” thick board or wood + 3/16” & 1/16” paper punches straight pins + brass/gold or silver colored ¼” bugle beads + buttonhole thread + seed beads + wire cutters + safety glasses
Instructions:
-Make copy of mirror image printies. Carefully cut out the images.
-Soften a color of Fimo that is complimentary to the printie…yellow for the yellow duck and orange for the orange duck. Roll it smooth & flat with pasta machine or by putting a 3/16” thick piece of book board or stripwood on either side of the Fimo and with the edges of your rolling pin (or similar too…but if you don’t have one a child’s rolling pin is perfect for these small projects.) resting on the book board/stripwood roll over the Fimo until it is flush with the book board/stripwood. Bake the Fimo according to package instructions or it may be cured with a heat gun.
-Glue one of the mirror images to the flattened clay and use a shape knife to cut out around it. Glue the 2nd image to the other side and then if necessary use knife, files, and sandpaper to make both sides even and the Fimo smooth.
-From the extra images of the orange duck cut out the wings and glue them to a scrap of 1/16” thick paper and when glue has set, cut out and glue the wings over their matches on the duck.
-For the Yellow duck paint the Fimo edges of beak orange and the edges of the waves blue.
-From 3/32” board or wood cut out bases, 5/8” x ¼” for the orange duck and ¾” x ¼” for the yellow duck; paint as seen.
-For each toy punch out four, 3/16” diam. rounds from 1/16” board for the wheels (color of your choice) and four, 1/16” rounds for the for hubs (color of your choice. Poke or drill a hole thru the center of the wheels large enough to take a straight pin snuggly.
-Put on safety glasses and then cut the head off a straight pin. Insert it into the hole in a wheel so it is flush with the outside of the wheel. Glue the hub over the hole on the outside. Add the tiniest dot of Krazy glue to where the pin touches the wheel on the inside. Insert a bugle bead on the straight pin and then push the end of the straight pin into a 2nd wheel and push it up until the whole wheel/axle assembly is approx. 3/8”…put the safety glasses back on and nip off the excess pin. Glue the hub on this wheel. Make two of these assemblies for each toy. Glue the wheel assembly to the underside of the base, set in about 1/8” from the ends.

-Poke a hole centered in one end of the base and glue the end of a length of buttonhole thread into it. You may also choose to make a knot in the end of the buttonhole thread and glue it to the end of the base if you do not want to make the hole. Decide on the length you want your pull cord to be and knot it at this point, pulling know tight. Slip a seed bead (your choice of colors) onto the thread, snug it to the knot and form another knot and snug it up to the bead and tighten it. Cut off excess thread leaving a tiny tail, fray out the tail a bit.
-Now you can go play, especially if you wore your safety glasses while cutting the pins…the pins can fly across the room and you don’t want one in your eye!
PS I have given you an extra printie, a bunny, for a third pull toy.

Print at best setting
=====================================================
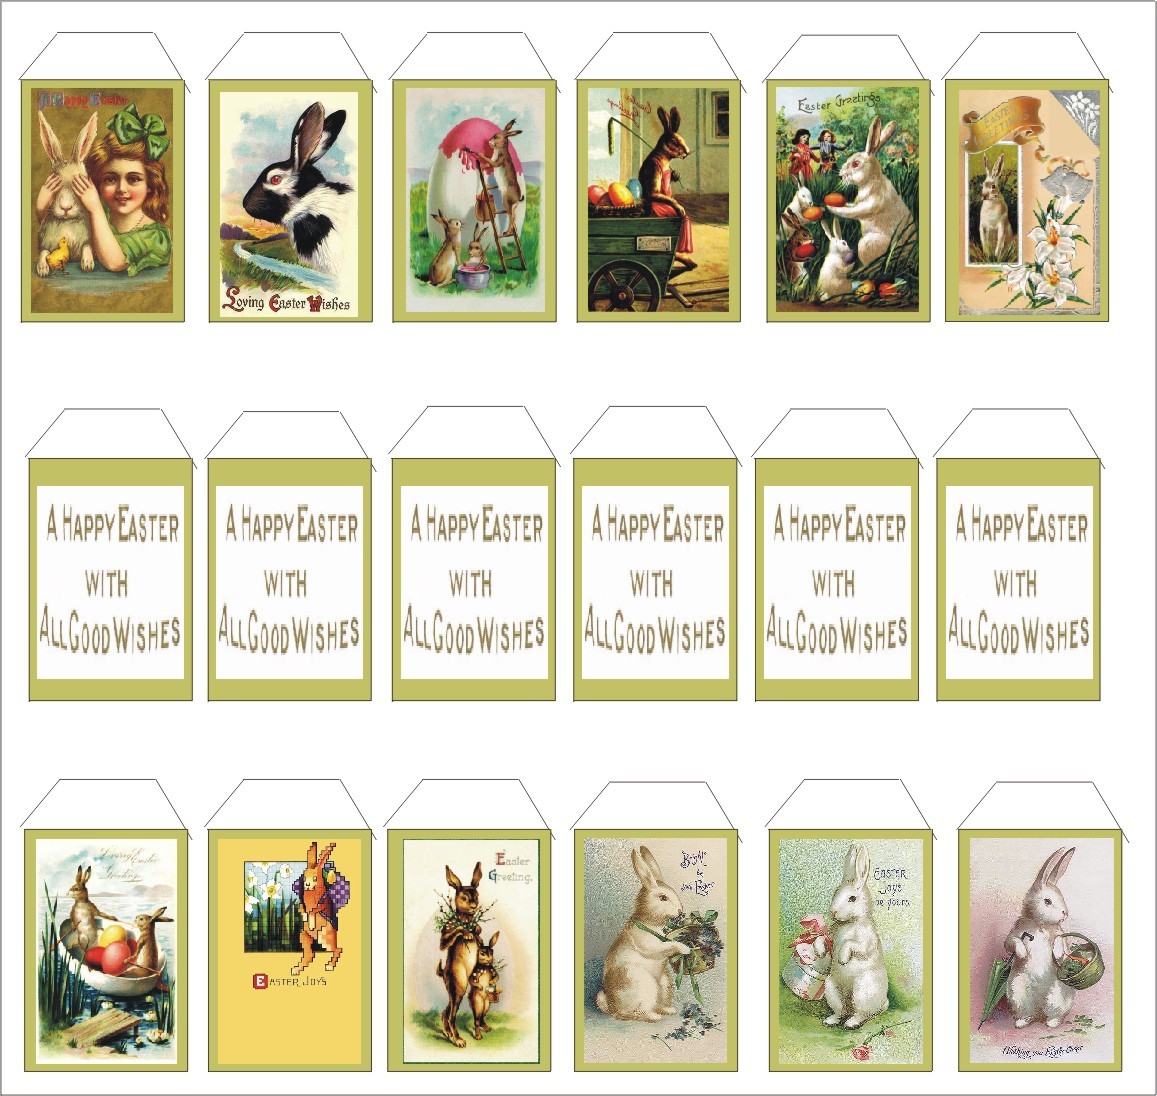
Project #6: Antique Postcard Garland

This is a version of a full-size garland a friend gifted to me a few years ago. I drape mine from a kitchen shelf.
You will need: printie of postcards on matte presentation paper (Epson used here) + glitter glue (Collie Scintillante brand used here) or craft glue that dries clear and crystal fine glitter (Martha Stewart brand used here) + fine cording of your choice

Instructions: Cut out printies and fold back on top tab line. Use a fine paint brush to add glitter glue or glue and then fine crystal glitter to all four edges of cards. You may also choose to add a bit on a detail in the pictures themselves, such as a basket or bow. Let glue set.
Choose a fine cording or such in your choice of colors and cut to length you wish your garland to be, keeping in mind the drape. Starting at center of cording, glue a prepared card to it by adding glue to the tab and the of the area of the card under it. Fold the tab around the cording and pinch it until it holds. Decide on the space you want between the cards and add more to the left and right of center until you reach your desired length.
Options:
-You may choose to have all picture cards or space as desired with the greeting card
-A bead or egg or such may be added between the cards.
-Ends of cording may be tied around a post or tied into knots held with glue and glued in position.
-Postcards, as seen, are not in exact scale so you may choose to print them at a ½” height.
-The postcards may also be cut as greeting cards and displayed on the cart.
Project #7: Bunny-in-the-Box

You will need: printies of pieces on matte presentation paper (Epson used here) + watercolor pencils in shades to match printie + gold sequin + 1/8” round paper punch + straight pin with a small bead head (notion in fabric stores), color head of your choice + needle nose pliers + wire cutters + a tiny gold no-hole bead + quilling paper in two different colors

Instructions:
-Cut out all three pieces of the box. Carefully color the edges of the cutouts where shown, using a fine paintbrush slightly dampened with water and run over the watercolor pencil….this will eliminate white edges & give a finished look to your piece.
-Score and fold the box on all lines.
-Glue the box together by the tabs.
-Glue the front and side flaps to the inside of the box.
-Score and fold the three sections of the lid. Glue the inside of design section of the lid down over the inside of the larger plain section, making sure it is very flat. Glue the white side of the smaller section to the inside of the back of the box.
-Cut out the white diamond center of the insert piece. Score and then fold the four white sections back. Set insert aside.
-To prepare for the crank handle, put a light coat of glue stick on a piece of paper and stick a gold sequin to it. Center a 1/8” round paper punch over the sequin and punch making a 1/8” round. Glue this round on the right hand side of the box, just past the top border and centered side to side. When glue has set poke a hole into the box side thru the hole in the sequin.
-Hold the straight pin in towards the pointed end of needle nose pliers just past its beaded head and bend to a right angle, making an approx. 1/8” section. Pinch the pin with the pliers just past the 1/8” section so about 3/16” of the pin is being gripped by the pliers and bend the pin again at right angle. Use wire cutters to snip the pin off approx. 1/8” past the last bend. (I know this would have been easier to see in a diagram but I was too lazy). Don’t forget your safety glasses when snipping the pin! Glue the “crank” thru the sequin and into the hole in the box so hardly any of it shows inside of the box. For a latch, glue a tiny no-hole bead to the top edge of the lid, centered side to side.
-Using two lengths of quilling paper, each a different color, glue an end of one over the end of the other at a right angle. You are going to fold in a Jacob’s ladder style, one strip over the other, back and forth, until the desired length of the “spring” for your bunny is reached. As you are creating the spring, from time to time stretch it out a bit to help you decide on the your length. (BTW, and off the subject, but the Jacobs ladder fold is an easy way to make ribbon roses using 1/8” silk ribbon. Rather than sing two pieces of ribbon, fold the ribbon in half at a right angle and pinch the folds between your fingers. After reaching the desired length, hold at the last fold and gently pull on one of the extending ribbons until the rose is form. Hold with glue. OK, back to the subject at hand). Glue an end of your spring centered in the bottom of the box.
-Put the insert into the box without glue, feeding it over the spring.
-Choose a bunny head and arms if you like from the printies and carefully cut out. You may add dimension to the head by drawing over it from behind with a round stylus. You may also add a heavy coat of Diamond Glaze. When the head is ready glue it to the top of the spring. When the glue has set you may bend the top of the spring slightly forward with the help of tweezers so the head is facing towards you. Arms may also be added…you can mix and match with the bunny cut-outs.

Set printer to print at exact/actual size or set it to
8.14"w x 10.43"h.. Print on matte presentation paper and print at best setting.
================================
Project #8: Calla Lilies
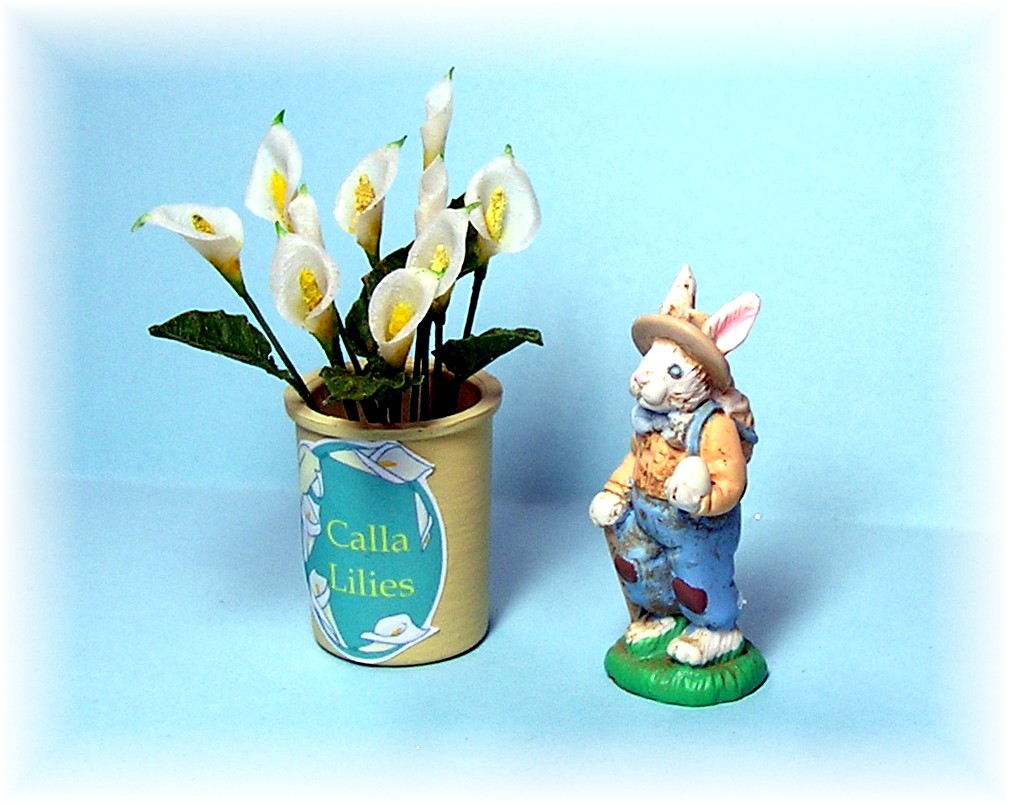
These tall and stately flowers, often used for Easter decorating, are quite easy to create in miniature.
You will need: #24 gauge green cloth covered wire + thick craft glue +Woodland Scenics Wildflowers (found at model train stores) + white & dark green floral tape + printie of patterns + yellow, light green and dark green water color paints + gel stain medium + dark green acrylic paint + blunt-nose tweezers

Instructions:
For each flower cut a 2” length of #24 gauge clothed wire. Dip the top ¼” of the wire into yellow acrylic paint and let dry. Coat the yellow paint on the stem with thick craft glue and then dip into finely shredded yellow craft foam (Woodland Scenics). With fingertips, mold the foam to the wire stem to form the flower center. Set aside to dry.

Mix a thin solution of yellow water color paint, water and add a tiny dab of gel stain medium. With a fine paint brush add light and irregular strokes of the paint mixture on the lower third of the petal’s base (see diagram). Make the same mixture substituting light green for the yellow and paint his on in the same manner only blending it into the yellow layer about 2/3’s of the way up the yellow. Repeat this procedure substituting dark green water color and painting it up 1/3 on to the light green area. Paint the very tip of the petal with the dark green mixture. Paint the wire with dark green acrylic to smooth and add thickness.
For each leaf, cut 1-1/2” lengths of dark green floral tape and a 1-1/2” length of the floral wire. Paint one side of the floral tape lightly with glue, lay the wire centered on the tape and fold the tape in half, sandwiching the wire. Press flat with finger and set aside to dry. Lay leaf pattern on prepared floral tape, even with the top (fold side) and cut out. Lay leaf on a flat surface and use blunt nose tweezers to pinch veins into it on both the left and right sides. Slightly fold the leaf lengthwise and slightly turn it back from the stem. The leaf may be touched here and there, ever so lightly, with other greens and/or tan colors for realism.

Arrange in a container to “sell” the stems; arrange in a vase for display; “plant” in a pot with leaves attached to bottom of blooms.

Project #9 : Gift Bags

You will need: Printies of Gift Bags on bright white paper + buttonhole thread + craft glue

Click on pattern to enlarge. Copy and paste to computer.
Set to print at exact/actual size or 3.22"W x 2.18"H
Instructions:
-Cut out bags. Look at the bag pattern to see where to score, crease and then fold the bag cut-outs.
-Glue the bag side over the tab and let glue set.
-Pinch the bottom into two triangles and glue one over the other. This is make easier by slipping a piece of square stripwood into the bag so you have something to press on.
-Pinch the sides of the bag together causing them to fold inward. You may also fold the bottom of the bag up. A quick look at a real size gift bag will make the instructions easier to follow.
-Cut buttonhole thread to length shown in the curved section of handle pattern, two for each bag. Cut out handle patterns eliminating the curved section. Glue the threads to the handle cut-outs by placing their ends on the lines on the cut-outs.
Glue the handle assemblies to the inside of the bags, one on each side, placed as shown.
-Fine translucent glitter may be glued over some of the bag's designs for a bit of glitz if desired.
-Bags can be displayed by hanging from the posts of the cart or filled with tissue with an Easter item sticking part way out of the top of the bag.

Set to print at actual/exact size or 8.39"W x 5.69"H
Print onto bright white paper
=====================
Project #10: Easter Glitter House

You will need: printies of house, doors, windows on matte presentation paper + craft glue and glue stick + scrap of matboard for base + light green acrylic paint for grass + a small, flat , rather stiff paint brush + crystal diamond dust ( DecoArt Glamour Dust used here)+ 5 mm green pompoms + asst. colors of tiny no-hole beads + optional: Mini-scallop Paper Edger scissors

Instructions:
Carefully cut out house, roof and chimney. Score and fold inward on all lines.
For the house, glue front and back on side tabs. Put glue on top tabs of the house, making sure they are at right angles to the house, and to the top edges of the house sides and adhere the roof evenly over the house. Fold the chimney inward and glue the right side over the tab t for a sort of square tube. Fold the top inward and glue the tab to the inside of the chimney. Glue the chimney to the house on the side of the roof with the cut out slot. If you would like eaves on your house as seen, cut thin strips of presentation paper using mini-scallop scissors. Glue to front and back edges of roof, trimming to an angle at high point of roof.
Choose door/s and window/s for your house, cut out and glue in place. Decide on how large you wish your base to be (as seen it is 7/8” x 1-1/8”) and cut it from matboard If you want a path from the house draw it with a pencil and then paint the rest of the base green. Glue the house to the base, placed as desired; making sure it is sitting flat.
Set a piece of computer size paper in front of you. Swipe the paint brush over the glue stick and then apply the glue to the house and grounds a section at a time. As soon as the glue is applied to a section sprinkle it with crystal diamond dust, working over the paper. Tap off excess glitter and go on to the next section. When all glitter has been applied fold the paper so you can pour the excess glitter back into its container.
The bushes are green 5 mm pompoms which have been “painted” lightly with glue stick and sprinkled with glitter. After the glitter is set glue the bushes to the grounds. Apply the tiniest of das of glue to the bush and stick on pink no-hole beads. Bunny cut-outs may be placed on the path.

Click on image to enlarge. Copy & paste to computer. Set printer to print at exact/actual size or 7.33"W x 4.63:H
Use best settings and print on matte presentation paper.
------------------------------------------------------------------
 Print at actual/exact size or 1.28"W x 0.62"H
==============================================


Use best settings and print on matte presentation paper.
------------------------------------------------------------------

==============================================
Project #11: CHICKS

These are so sweet & tiny that you can almost hear them peeping.
You will need: yellow pom-poms, in 3mm & 5mm, one each for one chick + golden yellow paper + craft glue + tiny black no-hole beads
Instructions: Glue a 3mm pom-pom (head) to a 5mm pom-pom (body). Cut one beak (on fold), two wings and two feet from golden yellow paper. Glue cut pieces in place to body and head, using tweezers and the tiniest amount of glue: beak, slightly open, to front of head, feet under body, sticking out so chick will stand on its own, and wings to side of body. Glue a tiny black no hole bead slightly above and on either side of the beak. Peep! Peep!.

PATTERN
Click on image to enlarge. Copy and paste to computer.
Set to print at actual/exact size or 1.88"W x 0.70"H

DIAGRAM
--------------------

===================================
Project #12: Forsythia Branches

You will need: small stemmed dry foliage (look thru your packages of dried foliage for interesting stems; cut off any flowers, etc.) + olive green acrylic paint + yellow and light leaf green paper + paper punch wit 3/16” stars (Martha Stewart border punch used here, as pictured…the 2 smallest stars were used for the project. Although Forsythia actually only has four petals per flower this six pointed star works well…of course if you are so inclined you may choose to cut off 3 of the points) + 1/8” round paper punch + scrap of thick fun foam + Loew Cornell Double Ended stylus DES + pointed tweezers + thick craft glue such as Crafter’s Pick Incredibly Tacky

Instructions: After trimming any flowers etc. from your stems and cutting them to desired lengths, paint them an olive green…this will not only color them but also strengthen them.
Punch out flowers from yellow paper. Lay the two smallest sizes on the fun foam and use the smallest end of the stylus (or similar tool) to push down on each flower until it partially sinks into the foam. This will cause it to tightly cup-up; if a hole is poked in the middle, all the better. Pull the flower out of the foam with tweezers, dip the end in a bit of glue and place on prepared branch. Add as many flowers as desired….there is not exact amount in real life.
Fold and crease a piece of light leaf green paper. Use a 1/8” round paper punch to form leaves by only allowing appox.1/4 of the punch to go over the folded edge of the paper. Pick up a leaf with tweezers and slightly open it, dip an end in glue and place on branch, some in groups of three or four on the end of a branch and others where flowers may bloom.
Leave some of the branch showing.
Choose a container for your forsythia, add a label, fill and place next to your cart.
Project #13: Pussy Willows
You will need: #24 gauge floral wire + brown acrylic paint + very pale gray acrylic paint such as Apple Barrel’s Dolphin Gray + a small amount of spackle or plaster of Paris or dry texture medium + toothpick
Instructions: Cut wire to desired length of branches and paint with brown acrylic; poke into a scrap of Styrofoam to dry.
For pussy willows, in a small container mix very pale gray acrylic paint with spackle, Plaster of Paris of dry texture medium and water to make a mixture that is as thick as cake frosting. Holding a prepared stem in you left hand, pick up a dab of the pussy willow mixture and form the top bud. Add more buds evenly down the stem by slowing turning the stem. Let dry in a scrap of Styrofoam.
Water down some brown acrylic just a bit and use it to touch up where the buds touch the stem. Some buds can have more of this paint up on them than the others as if they were not in full bloom yet.
Choose a container, add label and then branches. Set next to your Easter Cart.

Copy and paste image to computer
Set to print at exact/actual size or 1.98"W x 1.15"H
Print on bright white paper at best setting.
===========================================

Project #14: A Hat Box for Your Easter Bonnet

Print pattern on matte presentation paper. Before cutting out box or lid sides, score between sides and their pointed tabs.
Look around you for a 1-1/4” diameter tube or dowel to use for a form or use a smaller diameter one and wrap masking tape around it, even with one end, until it is 1-1/4”.

Use a pink water color pencil to color the white edge of the non-tabbed side of the hat box side piece. Wrap the hat box side piece around the form with the pointed tabs facing the end of the form and glue the sides over its tab. Fold the tabs over the bottom of the form. Add glue to the tabs and place the box-bottom piece evenly over them. When the glue has set use a black watercolor pencil to color the white seam between sides and bottom. Glue the box inner bottom in place.
With the box still on the form, wrap the lid sides around it, with tabs facing downward, and glue its side over its tab. Fold tabs inward and glue the lid top in place being careful not to get glue on the box itself. Doing this will insure a perfect fit, lid to box. Remove and make sure pointed tabs are all glued down. Glue inner lid in place. Use black watercolor pencil to color seam between lid sides and top.
You may add a ribbon or cording tie to box by poking two holes thru the sides of the box, across from each other and just below where the lid sits. Insert a length of fine ribbon or cording or as seen, edging cut from lingerie lace into hold and tie a knot to hold.


Display the box closed, with an Easter bonnet in or out, with a bunny peeking out or filled with miniature Easter ephemera.

EASTER HAT BOX PATTERN
Click on image to enlarge. Copy and paste to computer
Set to print at actual/exact size or 6.37"W x 5.79"H
Print at best settings on matte presentation paper
=============================
Project # 15: Bunny Tales a Children’s Easter Story Book

Print the pages on bright white paper and the cover on matte presentation paper.
Cut out the pages in one continuous piece. Neatly fold the pages sharply, accordion-style, starting on the left-hand side with an inward fold.
Keeping the smaller front and back pages free, glue the rest of the pages together in pairs by using a rather stiff, flat bristle brush to swipe over a quality glue stick and then onto the backs of the pages. Make sure there is no glue on the front of the pages and press the assembly even and flat.
Cut the cover out and score and on the spine lines. Glue the page assembly into the cover by its spine and when the spine is in place glue down the smaller facing pages to evenly to the inside of the front and back covers. Check for excess glue and then press flat until the glue has set.

Click on image to enlarge; copy & paste to computer.
Set to print at actual/exact size or 1.87"W x 1.27"H
Print on matte presentation paper or semi-gloss photo paper
Use best printer settings
------------------------------------------

Click on image to enlarge; copy and paste to computer
Set to print at actual/exact size or 8.33"W x 1.31"H
Print on bright white paper at best printer settings
================================================
Project #16: Bunny

You will need: one 10mm white pompom for the head + one white 12mm pompom for the body + two white 7mm pompoms for leg front and two for arms + two 5mm pompoms for the back of legs and two for the back of the arms and one for the tail + photocopy of the bunny ears on bright white paper + white felt + two 6mm goggle-eyes + punched 1/16” round or a hand cut triangle of pink art paper for nose + fine sewing needle and white thread (optional) + narrow silk ribbon or lace edging cut from lingerie lace + craft glue

Instructions:
Roll the head and body pompoms in the palm of your hand to form them into egg shapes. Glue the back of the flat side of the egg-shaped head to the pointed end of the egg-shaped body. Let glue set.
Roll the 7mm pompoms between your fingers to make them long and narrow. Glue these to the bottom of the bunny, one on each side and sticking out approx. 3/16” from body. Glue a 5mm pompom in back of the 7mm ones. When the glue has set, trim the bottoms of the legs flat.
Glue a 5mm pompom to each side of the body for the back of the arms. Roll two 7mm pompoms to long ovals and then flatten them as much as possible. Glue an end of these to the 5mm pompoms for the arms, positioned as desired.
Glue the remaining 5mm pompom to the back of the bunny for his tail.
Cut out the bunny ears. Glue them to white felt, pressing as flat as possible. When glue has set, cut out the ears. Lay them in palm of hand and draw over them with a large-ball stylus causing them to curve inward a bit. Pinch the bottoms a bit and glue to sides of head towards the back.
Slice the tops off of the goggle eyes and remove the black beads. Glue them to the head for eyes. Add the nose. You may choose to add whiskers by threading a needle with white thread and poking it thru the nose area of the head for whiskers. Glue a ribbon around the bunny’s neck and add a fluffy bow off to one side.

Click on ear image to enlarge. Copy and paste to computer.
Set to print at actual/exact size or 2.32"W x 0.94"H
Print at best setting on bright white paper
---------------------------

===============================================
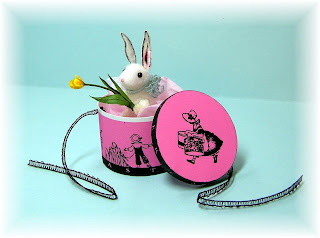
Project #17: Boxed Easter Postcards

Print the box & postcard fronts on matte presentation paper or semi-gloss photo paper. Print postcard backs on bright white paper.
Cut our box & clip tabs. Score and fold. Glue tabs to insides of sides.
Cut out postcard fronts & backs. Use a flat bristle paint brush to swipe over a tube of quality glue stick and then “paint” the glue onto the backs of the postcard backs and adhere them evenly to the backs of the postcard fronts; press flat until glue has set. Fill box with postcards.
You may want to make two boxes, one to display open the another to display closed. The postcards can also be used to decorate an Easter basket, sit on a mantle, be pasted in a scrap album, and so on. They are also fun to send to a miniature friend with a little message written on them….of course the will have to be posted in a real-size envelope.


========================================
Project #18: Easter Egg Tree
Project #18: Easter Egg Tree

You will need: snippets of twigs cut from preserved dried foliage + white & assorted pastel colors of acrylic craft paint + small (approx. ½” high ) wooden flower pot + scrap of Styrofoam + floral pips approx. 3/16” long or make your own using directions given for eggs in project #1 or form eggs from Fimo + Crafter’s Pick Incredibly Tacky Glue + railroad fine foliage in moss green (your model railroad dealer) + picket fence printed on matte presentation paper

Instructions:
Decide how high you want your tree to be and then cut snippets from dried foliage; paint them white. When dry arrange them pleasingly in a small pot which has also been painted white and filled with a piece of Styrofoam. Paint Styrofoam top with glue and top with fine railroad foliage to cover.
Paint the floral pips pastel colors. Cut them free leaving a little less than 1/16” of wire extending. Dip the wire end in glue to pick up a tiny dab and immediately place on tree…this glue will hold the egg right away. Add as many eggs as suits your taste.
Cut out picket fence printie. Decide what size you would like your fence to be (13/16” square as seen here) and fold the printie accordingly, cutting off excess, leaving one extra picket as a tab. Glue a side over the tab. Cut a bottom of the same paper and glue the fence on it. The edges of the bottom can be touched up with a green water color pencil.
Glue the potted tree centered into the fence enclosure. You may fill in around the tree with the same green foliage as used for the pot or use a coarser grade.
You may choose to add a bunny cut out to one or all sides of the picket fence. If so print the bunny on matte presentation paper and carefully cut out the image. Tinting the edges of the cutout with water color pencil will remove the cut edges.

Click on image to enlarge; copy and paste to computer
Set to print at actual/exact size or 5.87"W x 0.80"H
Print on matte presentation paper at best settings
-----------------------------

Print on matte presentation paper at best settings
===========================================


Have a Wonderful, Love-Filled Easter!
+++++++++++++++++++++++++++++++

Top of completed Cart
You may notice that I changed out the original shelf for a riser in the back. I decided that I was going to display my cart from the front and using the riser will allow everything to be seen.

+++++++++++++++++++++++++++++++