

______________________________

...And here it is, the filled Halloween Peddler's Cart. I hope you have enjoyed this progressive project as much as I have enjoyed creating it for you.
Have a frightlfully fun and safe Halloween! And keep in mind, as Hallmark says, "Itty-bitty candy bars don't make for itty-bitty butts"....lol, sorry, I couldn't resist it......
=================
This past spring (April 2011 post) we made an Easter Peddler’s Cart and considering that the project was popular with so many, fun to create, and, personally speaking, a delight to display I decided to do a version of it to celebrate Halloween. Make the cart to display the DIY Halloween projects that will be offered here over a period of days or with items from your collection. You may also decide not to make the cart itself and just pick and choose from the individual projects to add fun Halloween items to your miniature collection.
Do check back every day or so and scroll down to see what new Halloween items have been added to fill in and around the cart. This means I have my work cut out for me so I had better get going….
Joann
--------------------------
Projects to date to help fill the cart:
-Packaged Halloween Costumes
-Halloween Pull Toys
-Lollipops in Display Holder
-Ghost Swag
-Glitter Tree
-Greeting Cards & Display Stand
-Halloween Books
-Fright Tree
-Haunted House Table Decor
-Yard Sign Decorations
-Trick or Treat Bags
-Witchy-Way Weather Vane
-Note: Instructions for the masks seen on the cart are to be found (along with many others) in Miniature Collector magazine October 2008.
____________________________________________

TRICKS & TREATS
A HALLOWEEN PEDDLAR'S CART
---------------------------
THE CART
You will need: 2mm (approx. 3/32” thick) book board + 1/4” x 1/16” stripwood +
3/32” diam. bamboo skewer or dowel + fine sandpaper + needle file + ¼”square stripwood + 1/16” thick sheet wood or matboard + ¾” x 1/16” stripwood + choice of canopy material, paper or fabric (scrapbook paper used here) + 3/16 “ or ¼” square styrene tubing (model railroad supply) + two approx.1-3/4” diam. wheels (you may look in 2nd hand shops for interesting wheels found on discarded toys, or look online for similar metal & wooden ones) + cart printies
Note: To save myself time & because generally the construction is the same, some of the photographs used here are of the Easter Cart .

Instructions:
1. You will be making a simple box using book board. Cut two sides 5-1/8” x 1-13/16”, two ends 2-9/16” x 1-13/16”, a top and a bottom 5-1/8” x 2-3/4”. Glue the edges of a side piece to the face for the top piece, outside edges flush. Glue the edges of the end pieces to the face of the top piece and side piece, all outside edges flush. Glue the second side piece in place, long edge to the face of the top piece and face to the edges of the end pieces, all edges flush and all squared up. Glue the face of the bottom piece to the edges of the side and end pieces forming a closed box. You may choose to score the lines in the side and front & back pieces, as seen to simulate boards or you may choose to glue on paper printes...the finishing of both to be descrbed later.

Click on image to enlarge. Copy and paste to your computer.
Set to print at actual size or 6.92"w x 8.99"h
---------------------------------
2. Cut four, 2-3/4” lengths of the 1/4” x 1/16” stripwood. Glue one each to the top and bottom of the face of the 2 box ends, all edges flush. Cut four, 1-1/2” pieces of the ¼” x 1/16” stripwood and glue to face of ends, framing in the ends.


Click on pattern to enlarge. Copy and paste to computer.
Set to print at actual size or 7.07"w x 6.30"h
-----------------------
4. Cut a length of 3/32’ dowel slightly longer than the span between the two holes in the top trim, approx. 4 ½ “. Insert dowel into outside of one hole and then, with a bit of glue, into inside of the 2nd hole until it is flush with the outside of the 2nd hole. Trim dowel so it is flush with the outside of the 1st hole. A bit of glue may be wiped over the cut ends of the dowel. Lightly sand all corner just a bit. You now have the cart base.
5. If you wish to paint your cart to look like weather planks, paint the whole cart with tan acrylic (Delta’s Ceramacoat Palomino Tan used as seen). When the paint has dried use a medium-sized, stiff bristled brush and a dry-brushing technique to “whitewash” (Delta’s Ceramacoat Antique White used here) the planks as desired. When the white-wash has dried use a small pointed brush & Dark burnt Umber acrylic paint to add age, weathering, & knot holes, etc. to the planks. This is a fun job because it is hard to go wrong. You may also choose to just paint & weather the trim pieces and the top and bottom of the cart and then cover the sides, front and back with weathered plank printies, using quality glue stick to apply.


Click on image to enlarge. Copy and paste to your computer.
Set to print at actual size or 5.86w x 2.57h Print at best photo on either bright white paper or presentation paper.
---------------
6. From ¼” square stripwood cut four, 4” lengths for the uprights and two 2-5/16” lengths for cross piece/shelf supports. Mark an X in the bottom of each upright to find its center. Insert the end of a straight pin about 3/16” of an inch up into the center of the X; clip off the pin leaving about 3/16” extending (Make sure to wear safety glasses as cut pieces can fly) . Add a bit of glue to the pinned ends of the uprights and pound them into the corners of the top of the cart, just inside the trim edges. Make sure they are standing squared-up with the top of the cart. From the same wood cut two center braces to fit between the front & back uprights (measurement not given because it can vary slightly for each cart). Glue these braces between the uprights, one in front, one in back 1-7/8” up from top of cart.

Click on image to enlarge. Copy and paste to computer.
Set to print at actual size or 7.74" w x 10.83"h
-----------
7. From ½” x 1/16” stripwood cut two top braces 5-1/4” long. Paint the inside of these pieces to match your cart. Glue a ½” painted side of each of these pieces to the outside of the uprights, top edges even and corners squared-up.

NOTE: This photo is from the Easter Cart and is just meant to show the overall structure of the cart.
----------
8. From 1/16” thick matboard cut 2 canopy ends per pattern. If using canopy material other than vinyl wallpaper prepare for strength and fraying (iron-on facing for fabric & matte medium for plain paper). Paint the insides of canopy-end pieces to match cart. Cover outsides with chosen canopy material. If you would like a scalloped edge, as seen here, add ¼” to the length of material and use decorative scissors to cut scallops before gluing in place. Glue the prepared canopy-end pieces to the outside faces of the uprights including the edges of the top braces, outside edges flush.
9. Cut a 5-3/16” length of ¾” x 1/16” stripwood for canopy top support. Paint the underside to match cart. Glue the ¾” ends of this piece to the faces of the canopy end pieces, top edges flush.
10. Cut a 4-3/4” x 5-3/8” piece of canopy material. Pre-creasing along the edges of the material that will be touching the side and top supports before gluing canopy in place will help with the job. Glue canopy centered on top of the canopy top support, and to top edges of side canopy supports and then to outsides of top braces (letting scallops extend down to match scallops on sides if they were cut). Note: Pre-fitting your canopy will aid in its assembly. And of course if you are using fabric for the canopy you may choose to turn back a hem before installing. If you choose to use a straight edge rather than a decorative one you can always add a decorative edging after installation.
11. For an axle cut a 2-1/4” length of 3/16” square styrene tubing and glue it across the bottom of the cart, 1-1/2” away from the back edge of the cart. Paint to match cart.

Underside of cart
----------
12. Look to 2nd hard stores for interesting wheels on kid’s toys (you will be surprised at how many interesting ones you will find) or you may choose to use book board or wood to cut plain round wheels or check our Metal Miniatures online. Paint 1-3/4” wheels to match cart.
13. Cut a 3-1/4” length of 3/32”or 1/8” bamboo skewer (you can use dowel but bamboo is stronger). Use a needle nose file to make holes in wheels of a size to take the dowel/skewer snuggly. Push it into a wheel with glue, until it is flush with the outside. Pass the dowel/skewer thru the axle and then add the 2nd wheel. If necessary, top with a ¼” punched round of poster paper painted to match wheel. Of course these measurements etc. may be adjusted depending on the style of wheels used..
14. Cut a cart brace per pattern from 3/32” thick book board or sheet wood. Paint to match cart. Test to see if cart sits evenly with the brace in place and if necessary make any adjustments. Glue the brace to bottom of cart, by the long edge and set in ¼” in from front edge of cart, centered side to side
16. The cart as seen sits on a white 8" x 10" wooden picture frame. A printie of a worn wooden floor is in the frame under the glass. Wooden findings have been glued to the underside of the frame for feet to raise the base just a bit.
The little witch pushing the cart is a purchased resin piece...a bit off scale but she just seemed perfect to man the cart. She is from RAZ Imports LTD.
14. Cut a cart brace per pattern from 3/32” thick book board or sheet wood. Paint to match cart. Test to see if cart sits evenly with the brace in place and if necessary make any adjustments. Glue the brace to bottom of cart, by the long edge and set in ¼” in from front edge of cart, centered side to side
15. Add printed signage: Make 4 printies of cart signs onto cardstock. Carefully cut out around and inside of the four printies. (Cut away from you, watch your fingers and keep your blade sharp). Paint the backsides of the printies with black acrylic. Use a fine paint brush and a black water color pencil to color the cut edges of the signs. Use a quality glue stick to add signs to cart, placed as seen. Signage may be added to body of cart if desired.
16. The cart as seen sits on a white 8" x 10" wooden picture frame. A printie of a worn wooden floor is in the frame under the glass. Wooden findings have been glued to the underside of the frame for feet to raise the base just a bit.
The little witch pushing the cart is a purchased resin piece...a bit off scale but she just seemed perfect to man the cart. She is from RAZ Imports LTD.

Click on image to enlarge. Copy and paste to computer.
Set to print at actual size or 6.48"w x3.92"h
Use best printer settings and print onto Matte Premium Presentation Paper
---------------------------

---------------------------------------------------------------------------
Have fun with the cart and check back often for DIY projects to fill it.
Have fun with the cart and check back often for DIY projects to fill it.
-----------------------------------------------------------
PACKAGED HALLOWEEN COSTUMES


You will need: copies of costume packaging + glue stick + 24-gauge wire + snippets of this and that for the faux costumes


Click on image to enlarge. Copy & paste to your computer.
Set to print at exact size or 8.24"w x 4.16"h
Print onto Bright White paper on Best printer settings
---------------------------------
Make copies of costume packaging onto bright white paper. Cut out, score on tab and center lines, fold tabs in and fold the packages in half. Glue a bag together by the tabs on each side, using a quality glue stick. Using a 1/8” round paper punch to punch out the half-circle at the top of the package.
Create a hanger for each package by wrapping a length of 24-gauge wire around an approx. 1-1/4” wide metal ruler, crossing the two ends of the wire at the top of the ruler and, while grasping the ends, twist them together three times. Snip off on of the two extending ends. Insert the hanger up into the package until the other extending end of the wire pokes out thru the punched hole in the top of the package. With the help of round pliers, loop the wire-end into an inverted U shape ending just past the three wire twists, making sure the inverted U is round enough and of a size to fit over the rod, hook, or nail you will hanging the costumes from.
Fill the bags with snippets of fabric, ribbon, fun fur, chenille stems, or what-have-you to simulate the costume pictured on the package, letting the content hang partially out of the bottom of the package.
------------------------------------------------
HALLOWEEN PULL-TOYS

You will need: copy of printies + black & orange Fimo + craft glue & Krazy glue+ orange & green acrylic paint + Diamond Glaze + 3/32” thick board or wood + 3/16” & 1/16” paper punches straight pins + four brass/gold or silver colored ¼” long bugle beads + buttonhole thread + two seed beads + wire cutters + safety glasses
Instructions:
-Make copy of mirror image printies. Carefully cut out the images.
-Soften a color of Fimo that is complimentary to the printie…black for the cat and orange for the pumpkin. Roll it smooth & flat with pasta machine or by putting a 3/16” thick piece of book board or stripwood on either side of the Fimo and with the edges of your rolling pin (or similar tool…but if you don’t have one, a child’s rolling pin is perfect for these small projects) resting on the book board/stripwood roll over the Fimo until it is flush with the book board/stripwood. Bake the Fimo according to package instructions.
-Glue one of the mirror images to the prepared Fimo and use a shape, pointed knife to carefully cut out around it. Glue the 2nd image to the other side of the Fimo, making sure it is lined up with the other one, and then if necessary use knife, files, and sandpaper to make both sides even and the Fimo smooth. Note: If you don't like working with Fimo, a piece of Balsa wood may be used.
-From the extra images of the cat cut out the head and glue it to a scrap of the prepared Fimo and when glue has set, cut out around the Fimo and glue in place over one side of the head on the cat.
-On the cat add Diamond Glaze to the eyes and on the pumpkin to the facial features.
-On the cat add Diamond Glaze to the eyes and on the pumpkin to the facial features.
-From 3/32” thick board or wood cut out bases to a size that is pleasing to you and paint them, orange for the cat and green for the pumpkin.
-For each toy punch out four, 3/16” diam. rounds from 1/16” board for the wheels (color of your choice) and four, 1/16” rounds for the for hubs (color of your choice). Poke or drill a hole thru the center of the wheels large enough to take a straight pin snuggly.
-Put on safety glasses and then cut the head off a straight pin. Insert it into the hole in a wheel so one end is flush with the outside of the wheel. Glue the hub over the hole on the outside. Add the tiniest dot of Krazy glue to where the pin touches the wheel on the inside. Insert a bugle bead on the straight pin and then push the end of the straight pin into a 2nd wheel and push it up until the whole wheel/axle assembly is approx. 3/8”…put the safety glasses back on and nip off the excess pin. Glue the hub on this wheel. Make two of these assemblies for each toy. Glue the wheel assembly to the underside of the base, set in about 1/8” from the ends.
-Poke a hole centered in one end of the base and glue the end of a length of buttonhole thread into it. You may also just choose to make a knot in the end of the buttonhole thread and glue it centered to the end of the base if you do not want to make the hole. Decide on the length you want your pull cord to be and knot it at this point, pulling knot tight. Slip a seed bead (your choice of colors) onto the thread, snug it to the knot and form another knot and snug it up to the bead and tighten it. Cut off excess thread leaving a tiny tail, fray out the tail a bit.
-Now you can go play, especially if you wore your safety glasses while cutting the pins…the pins can fly across the room and you don’t want one in your eye!

Click on image to enlarge. Copy & paste to computer.
Set to print at exact/actual size or 5.85"w x 3.26"h
Print onto Bright White paper using best printer settings
========================
LOLLIPOPS IN DISPLAY HOLDER

You will need: Scrap of ½” thick Foamcore (the same thickness of Balsa wood may be used if desired) + copy of the front & back of display holder onto cardstock or Glossy Photo Paper + copy of lollipops on Bright White paper + large sewing needle + asst. glues +1/4” round paper punch + scrap of white poster board + thin bamboo dowels of the type used for skewers, match-stick blinds, placemat, etc. (bamboo is used here because of its strength even when cut very thin. Note: 2nd stores are a good source for one-of’s re this type of bamboo…you will find many uses for it in your work) + clear nail enamel
Instructions for Display Holder:
Instructions for Display Holder:
-Cut the body of the display holder from a scrap of 1.2” thick foamcore, using the half-circle display signage piece as a pattern.
-Cut out the front and back printies of the display-holder and glue them in place to each side of the display-holder.
-Using the same paper as for the front and back of the display-holder, cut a ½” wide strip long enough to fit completely around the holder. Glue it around the outside of the holder, starting and stopping at center bottom.. Use your thumb nail to meld the side and face pieces together for a smooth finish.
-Use a needle to poke holes in the holder to hold the lollipops, making the holes three deep from front to back, and stagger the holes from each other in each row.
Instructions for Lollipops:
-Using a ¼” round paper punch, punch out the mirror image printies of each lollipop and 12 poster board rounds.
-For each lollipop glue a matching printie to the front and back of a poster board round, making sure to line up the fronts and backs with each other.
-Using a needle or pointed stylus to open up a hole in the bottom edge of a lollipop.
-Cut very thin slivers of bamboo and cut into approx. 5/8” length for handles. Insert the handles into the poked holes in the bottom of the lollipops with a tiny dab of glue to hold. Pinch tightly to close.

Click on image to enlarge. Copy and paste to your computer.
Set to print at actual/exact size or 2.80"w x 2.77"h
Print Display Holder onto Presentation Paper or Glossy Photo Paper
Print lollipops onto Bright White paper
===========================
GHOST SWAG
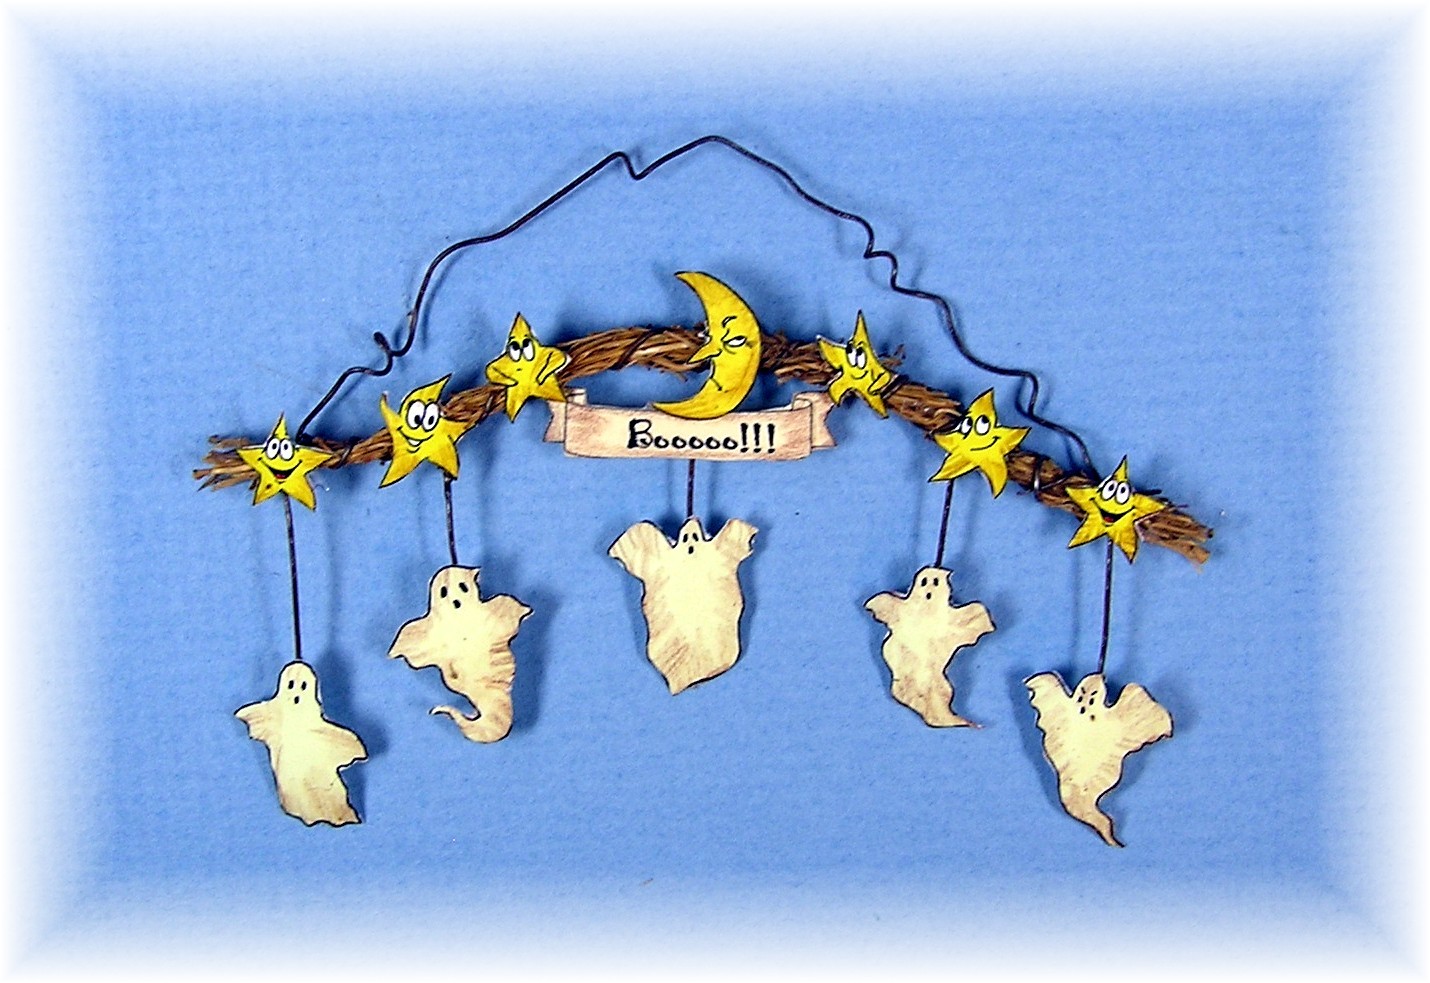
You will need: fine broom straw (small versions brooms of this type are often found in craft stores or check you whisk broom) + 30 gauge wire, brown or rusted (wire may be painted a rust color or soaked in a solution of ½ cup hydrogen peroxide, 2Tbs vinegar & 1 1/2tsp. salt to rust) + printie of banner of choice on manila paper + printies of stars and ghosts on matte presentation paper + Sienna Brown watercolor pencil + scrap of thick fun foam + medium/large ball stylus + Crafter’s Pick Ultimate Glue

Instructions:
-Make a bundle of straw approx. 3 ¾” long that when squeezed will be approx. 3/16” thick. Wrap the bundle, tightly, around and around, one end to the other with wire, leaving a bit of raggedy ends. Shape the straw rope as shown.

-Choose the banner you like & carefully cut out. Using the sienna brown watercolor pencil, on a slant, feather the color lightly around the cutout for a weathered look. Lay the printie face down on a piece of fun foam and draw on it with a round stylus to slightly indent, giving it some dimension. Put tiny dabs of glue on the top corners of the banner and attach hanging from the swag, centered side to side and towards front edge. The crafters pick will grab and hold in place in a minute.

Click on image to enlarge. Copy and paste to computer.
Set to print at actual/exact size or 1.90"w x 1.76"h
Print onto Manila folder paper or manila colored card stock
---------------------------------
-Cut out a moon of your choice and prepare with watercolor pencil and stylus as for banner. Glue it centered on face of swag with the bottom just touching the banner
-Cut out the stars and prepare them with watercolor pencil and stylus as described above. Glue them on face of swag, centered on either side of the moon.
-Cut out ghosts and prepare as for banner with watercolor pencil and stylus. Cut lengths of wire and glue one end approx. halfway down back of ghosts. When glue has set, trim wire so that there is enough length to glue the other end under a star and hang to length desired…see photo. Glue in place with tiny dabs of glue.

Click on image to enlarge. Copy & paste to your computer.
Set to print at actual/exact size or 4.47"w x 4.09"h
Print onto Natte Presentation Paper at best printer settings.
-----------------
-Make a wire hanger by twisting parts of the length around a needle here and there and then stretching it out a bit. Shape approx. as seen and form ends into little loops. Add dabs of glue to the end loops and glue to back of swag.

-Cute, huh? Hang from cart.
====================
When Witches Fly, a Halloween Glitter Tree

You will need: two black 6mm chenille stems (metallic tinsel stems used here …JoAnn’s Fabrics purchase…for the glitter effect but regular black stems may be used) + small sharp scissors + blunt edge wire cutters + strong craft glue such as Crafter’s Pick Incredibly Tacky + Krazy/Super glue + tweezers + white buttonhole thread + scrap of matt board + black acrylic paint + optional: fine black glitter + assorted size rounds punched from poster board or assorted sizes of round beads + orange or copper colored fine glitter + 1/8” silver foil stars + appropriate sized mirror image stickers of either a witch or bat with some metallic trim if possible (as seen a Joann’s Fabrics purchase from tattooking)
Instructions:
Instructions:
1. Use scissors to trim chenille off of the stems, fairly close to the wire.
2 Use wire cutters to cut a 2 ¼” trunk from the trimmed stem.
3. Cut an approx. 3/4” round or square of matboard for the base. Make a hole in the center of the base to take the end of the trunk. Paint base black. The black base may also be coated with fine black glitter if desired. Glue the trunk in place in the base, making sure it is straight; let glue set.
4. Cut the rest of the trimmed stems into segments; six bottom branches 9/16” long, 6 next to bottom branches 7/16” long, 5 next to top branches 3/8” long & 5 top branches 1/4” long.
5. Make a small puddle of tacky glue and one of Krazy glue in throw-away containers (I save and use bottle caps for this purpose). Add the bottom branches evenly around the trunk, starting ½” up from the base. To do this hold a branch with tweezers and dip one end slightly into the tacky glue and then into the Krazy glue and then place directly onto the trunk, at a right angle. Hold for a few seconds until the glues grab. The Krazy glue will take hold instantly and help to hold the branches until the tacky glue sets. Space the branches evenly around the trunk. Add the next set of branches in the same manner, 3/8” up from the bottom branches. Add the next set of branches 5/16” up and the top branches 3/16 up from the last branches.
6. When glue has set you may choose to cover any obvious “glue-globs” with black acrylic.
7. Decorate the tree as desired. To replicate the sample: Use various sizes of rounds punched from poster board or round beads (sample used punched rounds but in retrospect I would have chosen beads). Coat them with tacky glue and dip into orange or copper extra fine glitter. Note: if using beads hangers may be added with fine wire. Fold a length of wire in half forming the top into a loop ending in a twist. Insert the ends into the bead and bend the ends back onto the bottom of the bead, cutting off any excess. Glue the rounds or hang the beads just under the ends of the branches, staggering the sizes from larger at the bottom to smallest on top. Glue a silver star onto of branch ends, directly above the orange balls. Glue the same stars up the trunk, one each in the spaces between the branches. Add a sticker tree topper and back with a mirror image of the same, enclosing the top of the tree trunk.
Note: If you would like a smaller tree look in the archives for The Easter Cart.
======================================
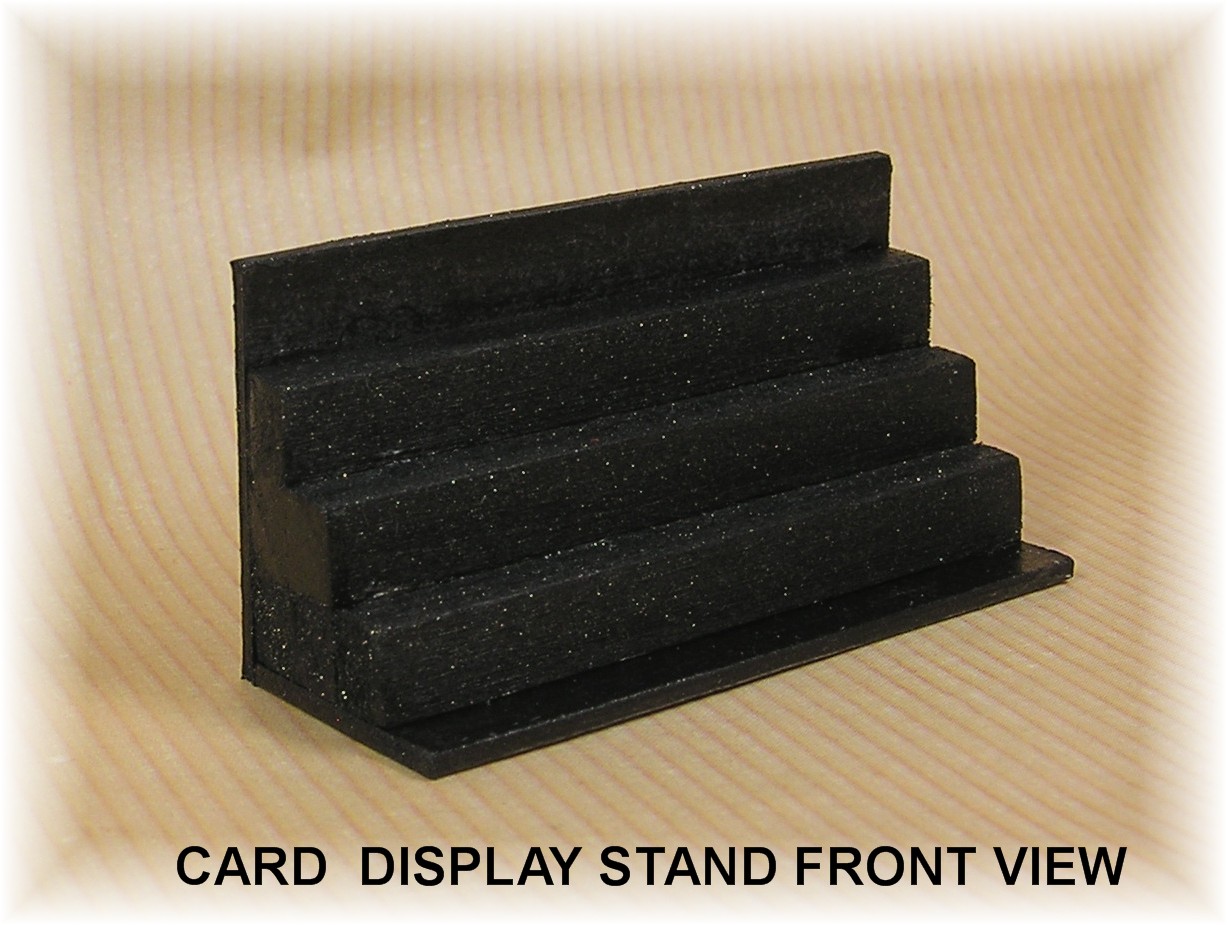
GREETING CARDS & DISPLAY STAND

You will need:
printies of cards onto your choice of papers (Bright White is the easiest to work with; Matte Presentation Paper has more body but a bit stiff to hold a tight fold; Semi-Gloss Photo Paper gives the best image but also a bit stiff to hold a tight fold & printe of signage on either semi-gloss photo paper or matte presentation paper + ¼” square stripwood + scrap of matboard + craft glue + black acrylic craft paint

Instructions
Make printies of cards & display sign. Cut and fold cards.
Cut six lengths of ¼” square stripwood, each to desired length of finished display shelf…sample is 2 ¼” long. You will want to lay out the cards you wish to display on a shelf to see what the overall length of a filled shelf needs to be.
Stack the wood strips together, with glue, like steps…1, then two high, & then 3 high. When glue has set, sand smooth and paint as desired… Folk Art’s sequin black used here for a bit of glitz.
The whole display stand is glued to a matboard base which was cut the same width and ¼” deeper than the shelf, with the extra depth extending out the front. Another piece of matboard, the same width as the stand and ¼” higher, was cut and glued to the back of the stand with the extension to the top.
Cut the sign out and glue it to the back of the stand with the wording facing front and set up high enough to sit above the top row of cards…which means you may want to position it after the top row of cards are in place.
Display the cards with the shorter ones in the bottom row and stagger the sizes on up as much as possible.

Click on sign image to enlarge. Copy & paste to your computer.
Set to print at actual/exact size or 2.62"w x 1.34"h
Print on semi gloss photo paper or matte presentation paper

Click on image to enlarge. Copy & paste to your computer.
Set to print at actual/exact size or 8.28"w x 2.25"h
Print at best settings on you choice of papers.
============================
HALLOWEEN BOOKS

You will need: printies of book pieces on Bright White paper + scissors or craft knife & straight edge to cut out printies + quality Gluestick + small flat paint brush

Instructions:
-Cut out printie cover & two matching page strips.
-Score, fold & clip cover as shown. Open up. Glue all folded edges to inside of cover using glue stick and a brush to apply. When glue has set, fold back and front in on spine lines.
-Each book has two page rows. Glue stick the last page of the top row evenly to the first page of the bottom row, back to back to make one long page strip.
-Fold the page strip accordion-style, starting on the left side with an outward fold and then an inward fold and so on. Crease heavily.
-Working on the backside of the folded-page-strip use glue stick, applied with a brush, to adhere sets of pages together, starting with the 2nd & 3rd pages (the first and last pages are the end pages so do not glue these). Pinch the pages together to make sure all pages are lined up.
-Add glue to the back side of the first page and adhere it to the inside of the front cover, leaving a small border of cover paper all around. Do the same with the last page, adhering it to the inside of the back cover. Pinch or press the book flat until all glue has set.
-Grab a “cuppa”, put your feet up and enjoy some good “reads”.

Click on image to enlare. Copy and paste to your computer.
Set to print at actual/exact size or 8.39"w x 9.14"h
Print onto Bright White paper with best printer settings.
============================
HALLOWEEN FRIGHT TREE

You will need: small, thin twigs (dried oregano stems from the garden used here) + a container for the tree + a scrap of Styrofoam + black acrylic craft paint (Folk-art Sequin Black used here) + Crafter’s Pick Ultimate or Incredibly Tacky glue + assorted Halloween sequin-type confetti (this comes in packages offering a variety of sizes & designs…works well for various mini-projects)

Instructions:
-Look to the garden or houseplants for very thin dried stems. You may also look at faux plant material for suitable stems. Or you may create your own with fine, cloth cover wire. Paint the stems with black acrylic, or if you wish to retain the natural color, coat with a clear matte finish….this will make the stems stronger and more flexible. Note: As seen the tree is on the large size because it is meant to be used as a display for selling ornaments or at this size it would work well for a yard display. But it may be made any size, very small for a table topper or medium-sized for a floor piece, etc.
-Choose a suitable container, anything from a mini cauldron to shapely bottle top, the size depending on how tall your tree will be. Stuff the container with a chunk of Styrofoam. Paint the whole container, including the Styrofoam black.
-Dip the ends of the stems into craft glue and poke into the Styrofoam in the container, adding stems & arranging until the whole is pleasing to your eye.
-Dip the very tips of the confetti into glue and hang from tree. Note: Incredibly Tacky should hold almost instantly but if you have problems or are using a regular tacky glue you may wish to use a combination of tacky glue and cyanoacrylate glue/Krazy/Super Glue (make a small puddle of both, dip very tip of confetti into first tacky and then Krazy and quickly place on tree). Finish by adding tiny stars all along the stems.

Click on image to englarge. Copy & paste to your computer.
Set to print at actual/exact size or 1.58"w x 2.91"h
Print onto Matte Presentation Paper
==============================
HAUNTED HOUSE TABLE DÉCOR

You will need: cardstock printies of house etc.+ 3/32” black fun foam sheet + black acrylic craft paint + black permanent marker pen + quality glue-stick such as Avery or Scotch brands + extra fine black glitter & silver or white extra fine glitter + Crafter’s Pick Incredibly Tacky glue + black metallic tinsel stems + medium ball stylus + #30 gauge wire

Click on image to enlarge. Copy & paste to your computer.
Set to print at actual/exact size or 6.26"w x 2.91"h
Print onto Matte Presentation paper.
-------------------
Instructions:
-Carefully cut out two mirror images of the house. Color edges of cutouts with black marker pen. Paint the backs of the houses with black acrylic paint (not marker pen).
-Using CENTER pattern cut out 3 pieces of black fun foam & glue them sandwiched together. Note: Other materials may be substituted getting as close to the thickness as possible & then painting it black before assembly. Glue the black side of the houses to either side of the fun foam piece, bottom edges even and centered side to side.
-From the same fun foam cut a BASE per pattern. Pour some extra fine black glitter onto a piece of waxed paper and spread out. Coat the top of the base with glue stick and press onto glitter on waxed paper. Do the same for the base edges. Shake off excess glitter…you want a fairly even coating of glitter.
-Glue house to base with tacky glue, approx. ¼” from front edge of base and centered side to side.
-Scrape glitter off of the walkway area of the base. Using a brush, apply glue-stick on the walkway area and sprinkle with silver or white glitter.
-To create the bushes on either side of the walkway, cut snippets from black glitter-tinsel stems. Glue them in place. Add shiny orange no-hole beads to the bushes with the tiniest dots of glue….add the glue to a bush, one dot at a time and then pick up a bead with pointed tweezers and apply to the glue…6-8 beads should suffice.
-Carefully cut the ghost out and lay it upside down on a scrap of fun foam. Use a medium ball stylus to “draw” over the ghost in a rotating manner causing it to have dimension and slightly curve. Add him to the base with a bit of glue.

-To create the haunted tree, cut a 7” piece of #30 gauge wire. Fold it in half three times. With the aid of needle nose pliers, grasp the wire about ½” up from the bottom and twist tightly for a tree trunk. Cut the top loops apart and splay out at crooked angles for the branches. Cut trunk down to desired height. Glue in place to base.

====================================
YARD SIGN DECORATIONS

Make copies of printies on Semi-Gloss Photo paper. Cut out. Paint wooden sandwich pickswhite and glue centered down back of signs.
Paint your choice of containers black and when dry glue-stick on an advertising sign printed on Bright White paper. Fill container partially with Styrofoam to hold pick in place. Arrange signs in container, snipping off the length of some picks to allow for the best view of all signs.
The signs may also be used to hang from doors or porches by omitting the picks, punching two 1/16” holes in their top and adding a fine wire or thread for hanging.

Click on image to enlarge. Copy & paste to your computer.
Set to print at actual/exact size or 7.48:w x 2.89"h
Print onto Semi Gloss Photo Paper on best printer settings.
----------------------------


Click on image to enlarge. Copy & paste to your computer.
Set to print at actual/exact size or 3.59"w x 1.49"h
Print onto Bright White paper at Best printer setttings
=====================
TRICK OR TREAT BAGS

You will need: printies of bags + thread such as Knit-Cro-Sheen http://www.amazon.com/Knit-Cro-SheenCrochetThread.com + quality glue stick http://www.amazon.com/Avery-Glue-Stic.com + Crafter’s Pick Ultimate glue http://www.crafterspick.com/allpurposeglue.html

Click on image to enlarge. Copy & paste to your computer.
Set to print at actual/exact size or 6.05"w x 6.58"h.
Print onto Bright White Paper at Best settings.
-----------------
Instructions:
-Cut out printed bags. Score and fold on all lines. Glue-stick side over tab. Glue bottom closed by first folding in the end tabs and then gluing the large flap over them and then the smaller flap to the large flap. Glue the top hem to inside of bag. After glue has set, crease the narrow end sections of the bag down their centers from top to bottom.
-With your fingertip wipe craft glue onto a piece of cotton thread, such as Knit-Cro-Sheen, color of your choice, and hang to dry. Cut & shape bag handles from this stiffened thread…two for each bag. Glue the handles to the tabs as shown. Glue handle tabs inside the bags, slightly down from top edge and centered side to side, handle ends hidden behind tabs.
Note: If you are into fun/repurposed jewelry, these bags make darling earrings
================
WITCHY-WAY WEATHER VANE

You will need: 3 or 4 mm cube spacer beads (these are approx. 1/8”sq.) http://www.beadaholique.com offers these + Crafter’s Pick Incredibly Tacky glue + small bell shaped bead (wood one used here, approx. 7/16” h & 3/8” bottom diam. but many differ shapes with these approx. sizes can be used) + flat black acrylic craft paint & Sequin Black craft paint from FolkArt. + #24 gauge cloth covered wire + ¼” die cut confetti alphabet letters (look in Party Stores) + printie of witch on Matte presentation paper + 1 ¼” long eye pin

Instructions:
-Working on a piece of waxed paper, lay down a cube bead with its hole facing up. To it glue four cube beads, one to each outward side, with their holes facing outward (these will be the holes that will hold the directional wires. Glue two more cube beads stacked, evenly on top of the center bead, holes facing upward….these will be the holes that hold the figural wire.

-Make sure your bell shaped bead is even across the top and sand so if necessary. Punch a cardstock round and glue it to the bottom of the bead (larger end) to seal the hole. Glue the smaller end of this bead evenly to the bottom of your stacked cubes…this will be the part that attached to the roof.
-When all glue has set paint the assembly black with acrylic craft paint.
-Cut four, ¾” long pieces of #24 gauge wire. Glue a wire centered, across the back of each of a N, S, E, W letter from the confetti package. Make sure the letter is at a right angle to the wire. When the glue has set paint each wired letter black. And when the paint is dry glue the wire ends into the holes of the four corner bead cubes making sure the letters are straight.

Click on image to enlarge. Copy & paste to your computer.
Set to print at actual/exact size or 3.67"w x 2.10"h
Set to print at actual/exact size or 3.67"w x 2.10"h
Print onto Matte Presentation Paper
----------------
-Carefully cut out the mirror images of the witch. Glue the eye pin to the center of one witch, positioning the pin so the witches toe is just touching the pin…this should make her flying correctly. Use a brush to apply glue-stick to the inside surfaces of both witches and sandwich them evenly together, enclosing part of the eye pin. Pinch tightly to make sure all is sealed. Paint the assembly black and when dry insert the wire into the hole in the top bead with glue to hold at height desired.
-Paint the completed weather vane with a coat of Sequin black acrylic for a metallic look.
-Glue centered on top of cart.
-The weather vane can be weathered/aged with rust or start with a copper color and add a weathered verdigris patina.
-You can change the sizes of the basic pieces as desired and add a different figure to the top of the weather vane to top a house or garden shed.

================
Joann