Monday, April 28, 2014


VILLAGE BARBER SHOP

The Barber Shop is the 2nd structure in a series of tiny printie, cut & glue, paper buildings. It can be used as stand-alone piece, showcased under a dome and such, or it would work for toys in a dollhousetoy store or child’s room, etc.  You may decide to transform it into a glitter building as was done for the Church in my previous post here.
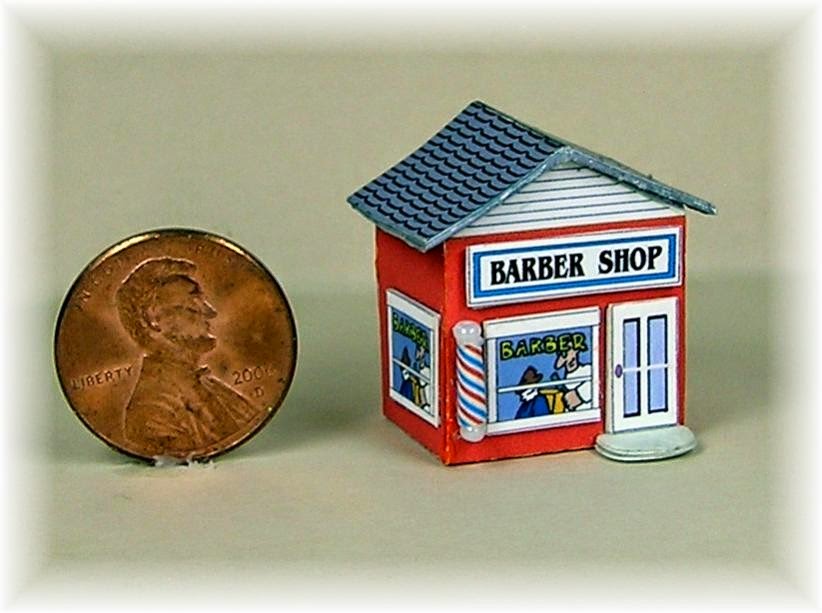
As seen, the shop has been glued to a matboard base and accessorized with N scale figures…a man sitting on a bench, a man arriving for his haircut, a dog and a garbage can.  N scale is a tad bit large for the building but I am pleased with the way it looks.
http://www.amazon.com/Woodland-Scenics-People-Benches   Explore Woodland Scenics http://woodlandscenics.woodlandscenics.com  and http://www.PEOPLESCALE.COM.  for a nice assortment of well-done figures and accessories Or if you have a local model train shop, do check out their inventory.  There also is a smaller scale, Z,  that can be used, if your eyes and fingers can handle it.

YOU WILL NEED: 
printout of patterns on matte presentation paper (acid free) see PDF file at the end of this article  +  small sharp scissors (Dr. Slick brand is recommended)  +  short straight edge & pointed stylus for scoring  +  pointed tweezers  + Craft glue such as Crafter’s Pick, The Ultimate & quality acid free glue Stick  +  gray water color pencil  +   2 tiny pearl seed beads +  clear nail enamel  +  Optional (if you want to make the tiny diorama as scene): N Scale model train figures & accessories +  bits of greenery snipped from green chenille stems painted with green acrylic paint  for weeds/grass  +  scrap of matt board for base   +   Bunka cording to cover edges of base 

 INSTRUCTIONS:
Print building and accessories patterns onto Matte Presentation Paper using best printer settings.   Printing out the pdf file found at the end of this entry should give you a perfect printie, size, color, etc.) 
When ink has set, cut out building; score on side/base lines and on all tabs.  Fold side tabs in at right angles.  Glue front and back to side tabs.  When glue has set, fold top tabs in at right angles. 
Cut out roof; score across roof on both fold lines.  Glue the white sides of the roof together smoothly.  Use a gray water color pencil to color the raw edges.  Glue roof evenly to top tabs of building with folded edge to front.
Glue the uncut door and windows to a scrap of the same paper.  When glue has set, cut out the pieces and glue them evenly over corresponding ones on the building to add dimension. 
Glue the uncut Barber Shop sign to double thickness of scraps of the same paper.  When glue has set, cut out and glue pieces over matching images on building.
Roughly cut out the door step and glue it over a double thickness of scraps of the same paper. Cut out; color the edges with a gray water color pencil (or you may choose to use the white side of the paper).  Glue the flat edge to the building, centered under the door.
Cut out the barber pole.  Lay it face down, on a giving surface such, as sheet fun foam, or even the palm of your hand.  Roll over it with a round toothpick until it starts to curve inwards.  Use your fingertips to roll it tightly back and forth until the roll has about a 1/16” diameter.  If necessary, glue the seam to hold.  Glue the pole to the front of the building, centered side to side, between the front window and the side of the building, and in line with the window, its seam to back. Glue a tiny pearl seed bead.to the top and the bottom of the pole. 
If you wish to showcase your barber shop in a tiny diorama or turn it into a glitter building, use the instruction given in the previous post here, The Church, as a guideline.

“SHAVE & A HAIRCUT, 2 BITS”


Saturday, April 19, 2014


THE VILLAGE CHURCH


This little paper structure that I have created for you was originally intended to be a stand-alone project for a bit of Easter whimsy, in the Glitter House genre.  And it turned out as planned…a fun little something to sit on a miniature mantel or center a holiday table, or be placed in a shop window & so on.  But something happened along the way, as often happens while creating… I found I also really liked the looks of the unadorned church. 


So much so that I became intrigued (or carried away) with thoughts of other buildings until soon I had a whole “Little Village” sitting before me, with even more in mind.   Each of no particular scale or style, just fun figments of my imagination. 


  Since I have come to realize from many of you that creating printies directly from Blogs does not give one the high res, desired for the clarity of  detail of the originals, I am at kind of a crossroad as to a solution.  I spend much time on details and it troubles me that you are not getting what I give you.  Suggestions have been made that that I open an Etsy store to offer there, for sale, hard copies of my printies.   So while you work with The Church (it is the least detailed piece of The Village buildings), I will decide what I want to do to make sure that you can have the best of what I do to create with.  Do let me know what you think.

Joann
PS
Go to the end of this post...I have a headache,lol, 
but I was able to add a pdf file
for the church pattern that will enable you to print
it to the correct size, color, and detail of the
original.  You can print it directly from the blog or
save it to your computer.  Do make any necessary
adjustments to your printer, re best settings & paper
type.  Do let me know how this works for you...as great 
as it worked for me I hope.  
Now I have to go lie down for awhile, hahaha.


TO CREATE THE CHURCH YOU WILL NEED:
Color copy of printie on matte presentation paper using best printer settings and using guide to scale key for sizing  +  small sharp scissors (Note: for years I have been using Gingher 4” Embroidery scissors http://www.amazon.com/Gingher-01-005290-Embroidery-Scissors-4-Inc for everything small and own multiple pairs but recently I was turned on to Dr. Slick Razor Scissors http://www.amazon.com/Dr-Slick-Razor-Scissors by Karin Corbin   http://karincorbin.blogspot.com (great blog - be sure to check out her wonderful laser cut Glitter House Kits).  These surgical quality scissors are wonderful, so sharp that they come with a “use at your own risk” warning.  They are perfect for making tiny tight cuts, etc.  Wish I would have known about them years ago…thanks Karin)   +   pointed stylus or similar tool & a straight edge for scoring paper +    +   quality craft glue such as Crafter’s Pick The Ultimate   http://www.amazon.com/Crafters-Pick-Ultimate-Glue  and a quality, acid free  glue stick  http://www.amazon.com/Avery-Purple-Application-Permanent (I like this one because it goes on colored so one can see where the glue is and isn’t and it dries clear) + a brown & a grey water color pencil (such as 


DIRECTIONS:
Print the building on to the white side of matte presentation paper using best printer settings.  Use the 1” sq. Guide to Scale key given to make sure you are printing at the correct size….of course you may choose to print it to other sizes as desired or needed for your purposes.
Carefully cut out the building; score on building sides and side and bottom tab lines.   Fold the sides, side tab and bottom tabs of building in at right angles. Glue sides & bottom together on tabs to form the building. You may choose to use either glue applying carefully with a small brush.  Fold in top tabs at right angles to sides.
Before cutting out the roof piece, score across its center as marked.  Cut out and fold on score line.  Using a matching brown watercolor pencil, color the roof edges, and an approx. 1/8” wide border on the underside and, if needed, the peak of the roof on the score line.  Apply glue to the top tabs of the church and to the underside of the roof where it will touch the church.  Adhere the roof evenly over the top of the building. 

 Working on the steeple, score on sides and tabs & cut out.  Fold side tab in, to right angle and glue side over tab. Glue steeple to church roof, centered front to back.  Fold the steeple roof tabs in at right angles.  Score & fold the steeple roof across the center. Use the brown watercolor pencil to color it as for church roof.  Glue the roof evenly over the steeple.
To add dimension to the church, cut out the door and windows & steps altogether in one piece of the paper, not individually, and glue smoothly, face up, to a scrap of the same paper. When glue has set, cut out individual windows and door.  Color the edges of all gut the step with a grey watercolor pencil and the step with brown.  Glue prepared door and windows over corresponding ones on the building.  Using craft glue, adhere the straight edge of the step just under the door.
If you would like a cross atop your steeple, cut a long 1/32” wide strip from the scrap paper.  Cut it in half and glue one piece evenly across the other piece.  Before cutting out the cross cover the area of the paper that will be the cross with a couple of coats of  clear nail enamel…this will strengthen the paper.  When the enamel is dry carefully trim the top and sides of the cross to approx. size of diagram on project sheet…making bottom cut the last.  Now don’t breathe to hard or you may lose the cross.  Pick the cross up by the top with pointed tweezers, dip the very bottom into strong craft glue and place on peak of steeple roof, centered front to back. Double check to see that all is even. Once the glue has set you may want to add another coat or two of nail polish to further strength the paper.


Now you have the Village Church.  If you want to transform it into a Glitter Structure as seen:

YOU WILL NEED:
Extra fine glitter   http://www.amazon.com/American-Crafts-24-Pack-Extra-Glitter/   (you can use any color/s you want, just make sure it is extra fine…I used apricot on the roofs and sunflower on the building) + a glue stick and a very small flat bristled paint brush to apply it +  A scrap of matboard (1-3/8”w x 1-1/8” deep  used here but may be any size) + grass green acrylic paint + fine model railroad turf such as
& a fine mesh strainer/sifter + green chenille stem + tiny no-hole beads (color of choice for flowers on bushes…I used an orange/copper color) + fine cording/Bunka http://secondchildhoodminiatures.com/supplies.html  

INSTRUCTIONS:
GLITTERING
Use a small, flat-bristled paint brush to apply a thin layer of glue stick, to the buildings first, and then the roofs.  Work on small areas at a time, applying glue and then sprinkling the glitter over it, tapping off excess…you will want a light coating of glitter for this tiny piece as  you are  not  replicating snow.  Do not glitter the door and windows.   Work over a clean sheet of lightweight paper and before you change glitter colors, lift the paper by two sides so you can pour the excess glitter back into its container. 

BASE:
Cut matboard base to size & paint the top and sides a grass green. Glue the church in place on the base, back sides flush and centered side to side.  Draw a path/walkway from church step to front of base, shaped as desired or following diagram. Cut the path shape from a piece of white or off white scrap of the pattern paper (I actually cut mine from a Ralph Lauren paint sample, River Rock-Coastal Sand (love these paints) and pulled off & used the top ply of the paper).


For the lawn, sift the green landscaping turf to get the finest of particles.  Paint the grass area of the base with craft glue and sprinkle on the sifted turf.  Press it a bit for good adhesion and shake or sweep of excess.
For bushes paint a green chenille stem with a darker green than the lawn.  When dry cut 10, approx. ¼” snippets; touch up the exposed wire tip with paint.  
Using pointed tweezers glue the bushes to the lawn, three on each side of the church and two each along the edge of the pathway.  Using a toothpick apply little dabs of craft glue here and there on the bushes and immediately after each dab pick up a group of no-hole beads with the tip of a slightly moistened toothpick (yeah, I used my tongue)  and press them onto the glue. 
If you wish to add Mr. & Ms. Bunny to the scene carefully cut out the images given (I used a magnifying lamp for this job…these eyes are getting old).  Color the edges & back with a grey watercolor pencil and glue in place on path.
The base edges are finished with fine cording/Bunka in a light yellow glued in place, starting and stopping at center back.


May the Easter Bunny leave you a basket filled with love and wishes come true,

Joann