
THE VALENTINE BOX
A 1" = 1' Miniature Do-It-Yourself Project
Parts 1, 2, & 3
Parts 1, 2, & 3

LITTLE STORIES: THE VALENTINE’S BOX
The Valentine Box is first in a series of “Little Stories”. Those around my generation will remember the Valentine Box. Before Valentine’s Day our school teacher would either have everyone bring a shoe box to school to decorate or ask us to decorate it at home. The decorations were of ruffles of crepe paper, heart & other cutouts, hand printed designs and whatever else made one happy & proud. I will say here that not all of the boys in the class enjoyed this project, as was reflected by some of the strange items & pictures that adorned their creations. The boxes were then set on our desks in preparation of the Valentine Party. It had a slit cut in the top to receive any number of Valentine Cards which were brought from home. We all walked around to each desk and deposited our cards in the boxes. And speaking of these cards…oh the hours spent deciding who was going to get which card, especially ones for our best friend and for someone we had a little crush on. Oh and of course since we had to give a card to everyone in class, deciding which one we were going to give to our un-favorite classmate took forever…lest they might get the wrong idea. All of this took much shuffling through a stack of cards. Often we had to wait until we got home to open our Valentine Boxes & look at the cards we had received…this could take as long as preparing our cards had done because we tried to read into the meaning behind the printed messages. Often one would find an unsigned card or two…maybe one pledging “love” (oh, who was that from, be still my beating heart) or maybe there would be one featuring a rather ugly monster and a not so “lovely” message (probably from the same person that you sent your “ugly” card to).
So, here we find our Valentine Box all decorated and our cards ready to sort through and sign. Please don’t send me your “ugly” one!
===================


If needed, paint the frames as desired. You may also choose to antique your color with a wash of mixture of a brown acrylic & Delta Gel Stain Medium, wiping back off as much of the wash as needed to achieve the look you want.
Cut a piece of bookboard to fit the opening of the cut frame. Cover this piece with flooring of your choice. As seen it is a simply a piece of off-white wool felt. Glue the prepared floor into the frame opening, on the rabbet, carpet facing up; set aside.

Choose what you would like to have viewed in the 2nd frame from what will be the back side of the project. This may be a Valentine card (the cards given here are pre-sized to fit in the frame), wall paper, scrapbook paper, or what have you. Cut the paper to the size of the opening of the frame. Cut a piece of bookboard the same size as the opening. Cover one side of the bookboard with the wallpaper of your choice which will be the interior wall (I would suggest you keep the design and color of this paper as “quiet” as possible so it does not compete with the details of the setting). Fill the frame opening with first the frame’s glass and then the Valentine card (facing out), followed by the wallpapered book board, facing in. Use a quality glue stick for adhesion.

Glue the face of the prepared back piece to the cut edge of the prepared bottom piece, evenly & at right angles to each other. When glue has set you may choose to screw the two pieces together from the back for more strength. Cover the whole bottom with a piece of plain scrapbook paper. Feet may be added to the bottom if desired. As seen dimensional heart stickers were added to the four exposed corners.

CARD SELECTIONS FOR BACK OF BASE
Click on picture. Copy & paste to your computer.
Set to print at Actual/Exact size
Print onto matte presentation paper using best printing selection


==============================
See you soon with Part 2,
Joann


DESK
You will need: acid free, 1.5 (approx. 16” thick) book board/ binders board/quality chipboard. Note: You may choose to use 1/16” thick sheet wood if desired + 1/32” thick cardstock + a drawer handle of choice + optional: ¼” square stripwood, 1/8” x 1/16” stripwood, 3/16” x 1/16” stripwood + acrylic craft paint of your choice (a buttermilk shade was used here)

Instructions:
From bookboard cut a top 2 ½” x 1-3/8”. Round off the corners of one side as seen on pattern. Use fine sandpaper or an emery board to slightly round off the top edges of all sides.
Cut 2 sides 1-5/16” x 2-7/16”. Glue a short end of a side piece to the underside of the top piece, set in 1/32” from the straight end, back edges even, leaving the top piece overhanging the side piece by 1/16” in the front.
Cut two top stretchers 1 ½” x ½”. Cut one bottom stretcher 1 ½” x ¼”. Glue the top stretchers to the underside of the top piece and to the inside of the side piece, one flush with back edges of top piece and side pieces; the other set in 1/16” from front edge of the top piece with its side flush with the front edge of the side piece. Glue the bottom stretcher to the inside of the side piece, 5/8” up from bottom & centered side to side.
On the inside of the second side piece measure and mark a line 5/8” up from its bottom edge. Glue this side piece evenly in place to the underside of the top piece and the edges of the three stretcher pieces.
For the braces cut three ¼” squares of bookboard. Cut them in half diagonally. Glue the stacked together in threes to make two braces for the bottom stretcher. You may also choose a ¼” square piece of ¼”sq. stripwood cut on the diagonal. Glue the braces in place to the underside of the stretcher and the insides of the sides.
Cut a faux drawer from cardstock, 1-9/16” x 7/16”. Slightly round off the top edges with sandpaper. Glue the drawer centered over the front top stretcher. Add a handle of your choice, purchased or made from a large round-head straight pin or a straight pin inserted into a bead, etc.
Cut two feet 1-3/8” x 1/8” from either board or 1/8” x 1/16” stripwood. Glue a 1/8” side of the feet to bottoms of side pieces, back edges flush, extension to front and centered side to side.
Cut three shelves from 1/6” thick board or sheet wood per pattern. Note: the shelves should extend out from the side the exact same measurement as the extension of the top so check your piece for the correct measurement. Measure and mark shelf placement on side piece…you may use those given or use your own to accommodate the height of something you may choose to display. Glue shelves in place to side piece, making sure they are at right angles to side piece.
Cut two 2-9/16” x 3/16” lengths of board or 3/16” x 1/16” stripwood for shelf supports. The length of these pieces should be the same as the entire height of the desk, so double check the height of your desk before cutting them. Slightly round off the outside top edges of both pieces. Glue a 3/16” side of the supports to the edges of the shelves and top piece placed as shown.
Paint desk desired color…two light coats work better than one thick coat. When paint is dry you may choose to go for a “shabby-chic” look by lightly sanding off paint in areas that would naturally get more use.
Note: Although this desk has a faux drawer it would be fairly simple to make a working one if desired.

Click on pattern image to enlarge.
Copy & paste to your computer.
Set to print at actual / exact size or 8.19"W x 6.81"H
=================================
DESK CHAIR

The chair used here is a “deconstructed” Chrysnbon Ladderback chair. The back was shortened by cutting off the top rail to just above the 2nd rail. The second rail was then cut off & replaced by a piece of cardstock curved to match the curve of the rails. The front stretcher was shortened a bit so the chair would fit into the desk opening.
The chair was painted to match the desk.
The seat was covered with a self-printed design (200 thread count inkjet fabric sheet). The printed design was cut out leaving enough fabric on all sides to enable covering the whole seat from top to bottom. The design area of the fabric was backed with a cotton facial pad and then “quilted” with needle and thread. The prepared fabric was then glued centered to the seat, clipping corners and trimming off excess, etc. The seat was then glued in place to the back and the top of the front legs.


Click on image to enlarge,
Copy & paste to your computer.
Set to print at exact/actual size or 7.96"W x 7.80"H
Print onto a quality printer fabric
-----------------------------
Here is a photo of the full size desk & chair which is now serving my 3 year old granddaughter when she visits. This desk & chair have been with me thru several moves and have been painted over many times…it was red when I purchased it at a church yard sale. I then painted it sage green to use as a recipe center in my kitchen. Next was flat ebony for my nightstand. And now as you see it has a shabby-chic look for a child’s room. Got to love these inexpensive, never-say-die, versatile, all wood, home constructed pieces of furniture.

In Part three we will address the accessories. See you soon….
Joann
========================================
=================

ACCESSORIES

LAMP & OUTLET COVER
The lamp base is a corked miniature, I” high, clear glass bottle. I filled it with multi-colored no-hole beads. I removed the cork’s brass eye pin and replaced it with a ¾” long brass eye pin.

For the shade, use the printie given here as a pattern and cut out a shade from a parchment-like scrapbook paper. Cut out. Lay the cutout on a giving surface and roll over it, following the shape, with a round pencil, or the like, until it curls over on itself. Glue the side over the tab. Trim both the top and bottom edges with 2mm cording, silk or cotton (usually found with beading supplies).

Click on image and save to your computer
Set to print at exact/actual size or 2.22"W x 1.12"H
----------------------------------------------------
Punch a ½” circle from a scrap of sheet acrylic (think blister packaging) and poke a needle hole in its center. Glue this piece snuggly and evenly into the lampshade.
To assemble, poke the eye pin down into the hole in the acrylic circle so the eye sits on top of it. Feed a small translucent or clear, oval bead on the eye pin and then push the eye pin down into and thru the cork and then fit the cork snuggly into the filled bottle (if needed the eye pin can be shortened).

Of course the lamp can be electrified with adjustments to these directions and supplies.
===============================
For the lamp cord use the same cording as for the shade trim. Tie a knot in one end and hold with glue. Glue the knot to the side of the lamp at the bottom. Glue a small white seed bead to the other end (length of cording is up to your needs) and glue the bead/plug to the outlet cover.
Print the outlet cover onto cardstock. Cut out and tool a bit to add dimension. Glue to wall as desired, preferably behind the desk placed so it can be viewed, for people who love to spot details in our miniature work.

Click on image and save to your computer
Set to print at actual/exact size or 1.45"W x 0.54"H
Print onto card stock
---------------------------------
CALENDAR
Print the calendar backing onto mate presentation paper and the calendar itself onto bright white paper. Cut out the two pieces and glue the calendar to the back piece by its top edge. Apply a dot of Diamond Glaze ( http://www.amazon.com/Judikins-GP005-Diamond-Glaze ) to the nail to add dimension. You may notice that the printie I have given you is lighter in tone than seen in my project. I felt the black color was too intense for mini work.
.jpg)
Click on image and save to your computer
Set to print at actual/exact size or 2.77"W x 1.48"H
Use best settings
Use best settings
======================
SILHOUETTES

Print silhouette images onto paper of your choice. A greyish, velum-like paper was used here. Cut out the images with border intact. Cut a piece of cardstock and a piece of clear acrylic sheeting (look around you for blister packaging) the same size as the silhouette cut-out. Use glue stick to adhere printie to cardstock. Add just a thin line of glue stick around edge of acrylic and press on top of printie assembly. Let glue set.

For framing cut 4 strips of copper foil tape http://www.amazon.com/Ranger-Memory-Glass-Foil-Copper To add the framing peel off the paper backing on the tape. Press it on to the top of the silhouette assembly using the drawn line as a guide. Trim of any excess extending over outer edges. Using your thumb nail, smooth out the tape on top and then run it across the top edge to crease the tape. Fold the tape down the edge, crease again, and then press the excess to the back. Do the top and bottom edges first and then the sides. When all four sides of the frame are in place use a sharp craft knife to cut through all layers of tape, on a diagonal, in each corner. Carefully lift & remove each corner. You may choose to tool a simple design into the foil tape using a pointed stylus.

Click on image and save to computer
Set to print at actual/exact size or 1.74"H x .87"H
Print on paper of choice
=======================
VALENTINE BOX & LACE & RIBBON BOX
In the printies I have given you a choice of a plain red one or a white one with designs. Print onto matte presentation paper, cut out, and cut out the slot in the lid. Score & fold; glue tabs to inside on box & lid. Decorate as desired with thin strips of crepe paper, fine glitter, cut-outs, rubber stamps, and what have you…you may choose to add your name so we will know whose box we are dropping our valentines in.
Prepare the Lace & ribbon box in much the same way. Fill the box with scraps of colorful lace & ribbon. Display it with the lid slightly askew and a bit of the contents hanging out to add some “movement”/interest to the setting.

Click on image & copy & paste to your computer
Set to print at actual/exact size or 4.98"W x 3.14"H
Print onto matte presentation paper
VALENTINES
Print onto matte presentation paper or semi-gloss photo paper. Carefully cut out. To make the valentines stand up you can cut a small square of self-paper to attach to the bottom or a small triangle to attach to the bottom of the back. Spread completed valentines across the desk in a pleasing manner, some flat, and some upright.

Click on image & save to your computer
Set to print at actual/exact size or 3.80:W x 2.42"H
Print onto matte presentation paper at best settings.
===============
GIFT BAG
Make copy of gift bag & cut out. Using the pattern as a guide, fold and vertically crease the lines as shown. Fold the tab back flat and coat it with a thin line of glue stick. Press the opposite side evenly over the tab, creating a box-shaped tube. Let glue dry.
Fold the bottom section of the bag sides inward which will cause the bottom of the front and back sections to fold along the crease lines, forming triangles. Glue the triangles, one over the other, to form the bottom of the bag.
Pinch the sides of the bag, causing them to fold inward. When you have pinched as far as possible without distorting the bag, stop and fold the bottom of the bag up over the font.
With your fingertips wipe craft glue onto a length cording, such as Knit-Cro-Sheen cotton thread http://www.amazon.com/Coats-Clark-Knit-Cro-Sheen-Crochet-Cotton and let glue dry. From this thread cut two handles to desired length. Glue the ends to the handle tabs and glue the tabs to the inside of the bag, corning down and placed as shown.
Fill with a variety of valentines (or whatever) poking out the top.

Click on image & copy & paste to your computer
Set to print act actual/exact size or 3.25"W x 3.04"H
Set to print act actual/exact size or 3.25"W x 3.04"H
Print on to bright white paper
==============
BOOKS
Make printies on bright white paper. Cut out, score on all lines, clip as shown. Fold tabs inward and glue in place. Pages may be cut from the edges of tablets or faux pages can be cut from scraps of foamcore, bookboard, matboard, fun foam, etc. Cut these slightly smaller than the book cover. Glue the page piece evenly into the cover. Use a quality glue stick for adhesion.

Copy & paste image to computer
Set to print at actual/exact size or 7.21"W x 4.47"H
Print onto bright white paper at best printer settings
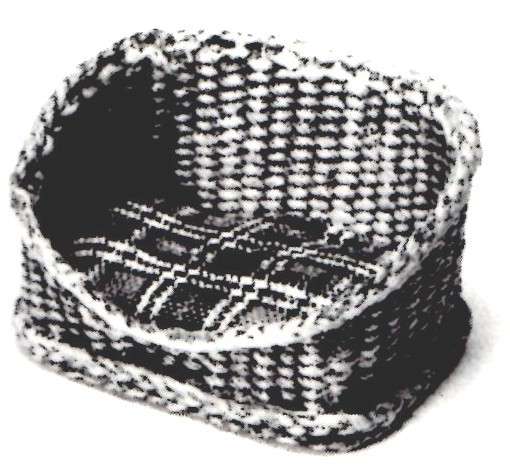
===========
PET BED

This is a project from my July, 1984 NN article, Dog Days (OMG, has it been that long, yep, just looked in the mirror, it has).
You will need: scrap of matboard + straight pins + J & P Coats Knit-Cro-Sheen cotton thread http://www.amazon.com/Coats-Clark-Knit-Cro-Sheen-Crochet-Cotton + Crafter’s Pick The Ultimate glue http://www.crafterspick.com +acrylic craft paint in color of your choice (as seen a buttermilk color was used) + ½ & ½ mixture of Delta Gel Stain Medium http://www.amazon.com/Ceramcoat-Painters-Helper-Stain-Medium & raw umber craft paint + scrap of lightweight cardboard and light weight cotton fabric in pattern of choice

Copy & paste pattern to computer
Set to print at actual/exact size or 2.23"W x 2.23"H
==========
Using pattern given, cut a bottom from matboard, transferring all markings. Use a needle tool, drill or something similar to make holes, as marked, thru bottom piece.
Use three strands of the cotton thread to braid enough length to wrap around outside edge of bottom piece. Saturate the braid with craft glue, hang to dry. Glue the braid around outside edge of bottom piece, starting and stopping neatly at center back & pressing the braid flat to matboard.
Insert straight pins up into bottom piece on marked dots until the stops of the pins are flush with the underside of the bottom piece.
Braid enough length of thread to go around underside of bottom piece to cover pin heads. Prepare thread with glue as described above. Glue in place & let dry.
Glue an end of a length of thread on the inside of bottom piece, just to the left of the center pin. Weave in and out of the pins 5 full times around. On the 6th run, eliminate the 1-2-3 pins & turn on the 4th, reversing directions, and turning on the 4th pin on the other side. Continue this procedure, eliminating a pin and reversing directions until you come to the marked back corners. Cut off excess thread and glue end neatly to inside.
Tap a little glue on top of woven thread where it touches pin. When glue has set use wire cutters to nip off excess pin. CAUTION: Cut pins tend to fly, so either hold bed in a paper bag or lay a piece of tape over pins when snipping.
Braid enough thread to go around top of bed. Prepare with glue and adhere around top of weaving, covering cut pin ends.
When all glue has set paint whole bed with a buttermilk color craft paint (or color of your choice). When paint has set apply a wash of the Gel Stain mixture and while still wet wipe back off until you are pleased with the antiquing. A damp cloth may be used to remove even more of the antiquing medium.
Cut a piece of lightweight cardboard to a size slightly smaller that bottom pattern. Glue a piece of cotton to the top of this piece and cover with a lightweight, cotton fabric of your choice, turning raw edges to back; glue into bed.
============================
My Inspiration for this Project

 =========================
My Inspiration for this Project


===============================